Understanding the Game Features Subsystem
This is an attempt to understand the Unreal Game Features Subsystem. The Game Features Subsystem is used in the Valley of the Ancient and Lyra examples, and in Fortnite, to distribute game assets and functions as plugins.
Plugins can contained both code and assets. Once support for the Game Features Subsystem is in place a particular game mode or map (or anything really) can be developed and distributed as a plugin and added to a game without modifying the base game. This has a lot of benefits including flexibility in development and better management of which assets are in memory when. The Lyra example uses this approach to deliver different game modes (such as deathmatch) as different plugins.
The Game Features Subsystem makes elements in the base game responsive to plugins being enabled and disabled. For example when a plugin containing a specific game mode is activated the player character gains access to new weapons and abilities, and when that plugin is deactivated they lose those abilities.
The notes below describe:
- how to add the Game Features Subsystem to an existing project (the Stack-O-Bot example) and
- demonstrates its functionality by adding a plugin which can be dynamically enabled and disabled.
Existing Plugins
Unreal Engine ships with plugins which support the Game Features Subsystem. We will be using these and adding new functionality to the Stack-O-Bot project using code from the Valley of the Ancient and Lyra projects.
The GameFeatures plugin contains:
- UGameFeatureAction base class
- UGameFeatureAction_AddCheats class
- UGameFeatureAction_AddComponents class
- UGameFeatureAction_DataRegistry - Specifies a list of Data Registries to load and initialize with this feature
- UGameFeatureAction_DataRegistrySource - Specifies a list of source assets to add to Data Registries when this feature is activated
- UGameFeaturesSubsystem class
- IGameFeatureStateChangeObserver interface
The ModularGameplay plugin contains:
- UGameFrameworkComponentManager - A manager to handle dynamically adding components to actors, and removing components from actors, as plugins are loaded and unloaded.
- UControllerComponent - an actor component used by the AController class which receives controller events such as ReceivedPlayer, PlayerTick
- UGameStateComponent - an actor component used by the AGameStateBase class which receives GameState events such as HandleMatchHasStarted
Creating the Project
Download the Stack-O-Bot example project using the Epic Game Launcher. Once it is downloaded it will appear in the Library|Vault section of the Epic Game Launcher like this:
Create a new Stack-O-Bot project by clicking "Create Project", name the project "StackOBot". Once the Epic Game Launcher has finished creating the project exit the launcher.
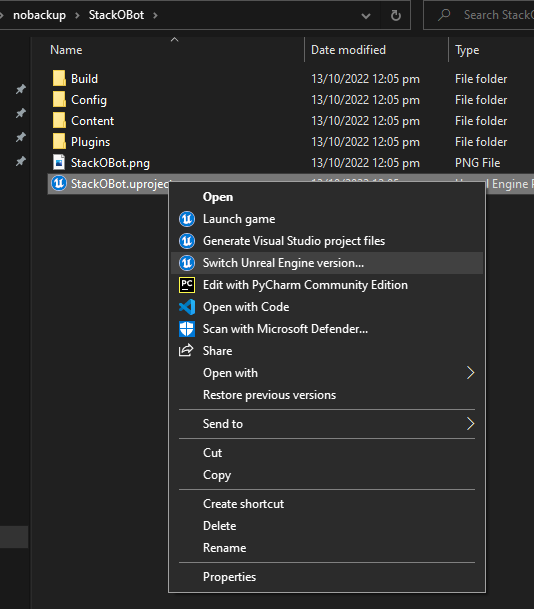
We will be using Unreal Engine 5.1 Preview version, so in Windows Explorer find the location of the project you just created and right-click the StackOBot.uproject file and chose "Switch Unreal Engine version" and change the version to 5.1. This process is shown here:

Open the project in Unreal by double-clicking the StackOBot.uproject file.
Depending on which Unreal versions you used, if might see a message like this:
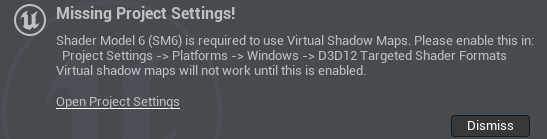
If so, update the setting as instructed by the message.
Making the Project Modular
Both the Valley of the Ancient and the Lyra project add classes to make the project behave in a modular way, so plugins can be created which contain content such as Gameplay Abilities and Input Mapping Contexts. These plugins can be activated to, for example, grant the player abilities which are defined in the plugin, and later deactivated to withdraw those abilities when the plugin is unloaded.
The Valley of the Ancient and the Lyra project classes (AModularPlayerController, AModularCharacter etc.) used to do this are
contained in their own plugin called ModularGameplayActors. These classes interact with the UGameFrameworkComponentManager allowing them to
add and remove components from derived classes in response to plugins being enabled or disabled.
GameFeatures Plugin
The Game Features plugin which ships with Unreal Engine has the classes shown on the bottom rows of the diagram below:
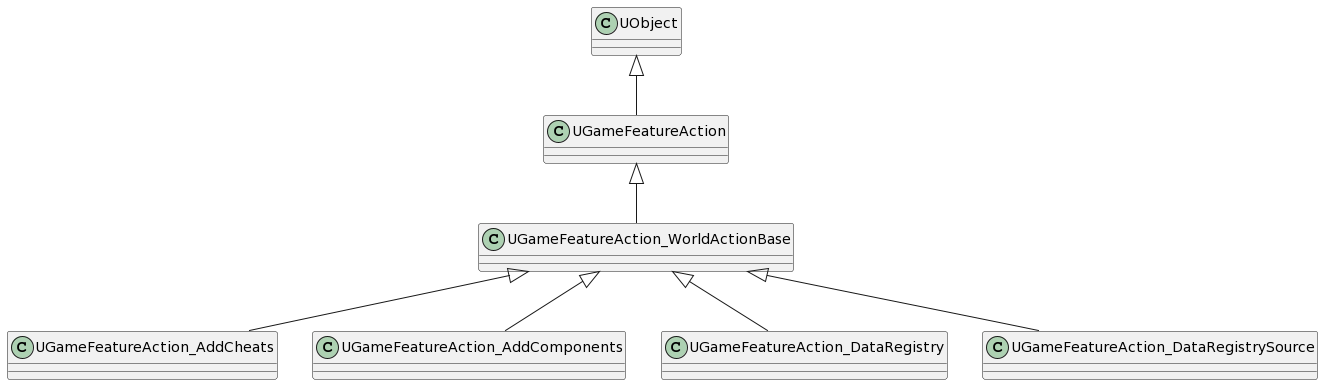
These classes all extend UGameFeatureAction to create actions which can be performed when
a plugin is enabled, for example UGameFeatureAction_AddComponents adds new components to specified classes.
When the Game Features plugin is enabled and you create a new plugin and add a new actions, the list of actions
you can choose from comes from the classes derived from UGameFeatureAction, as shown here:
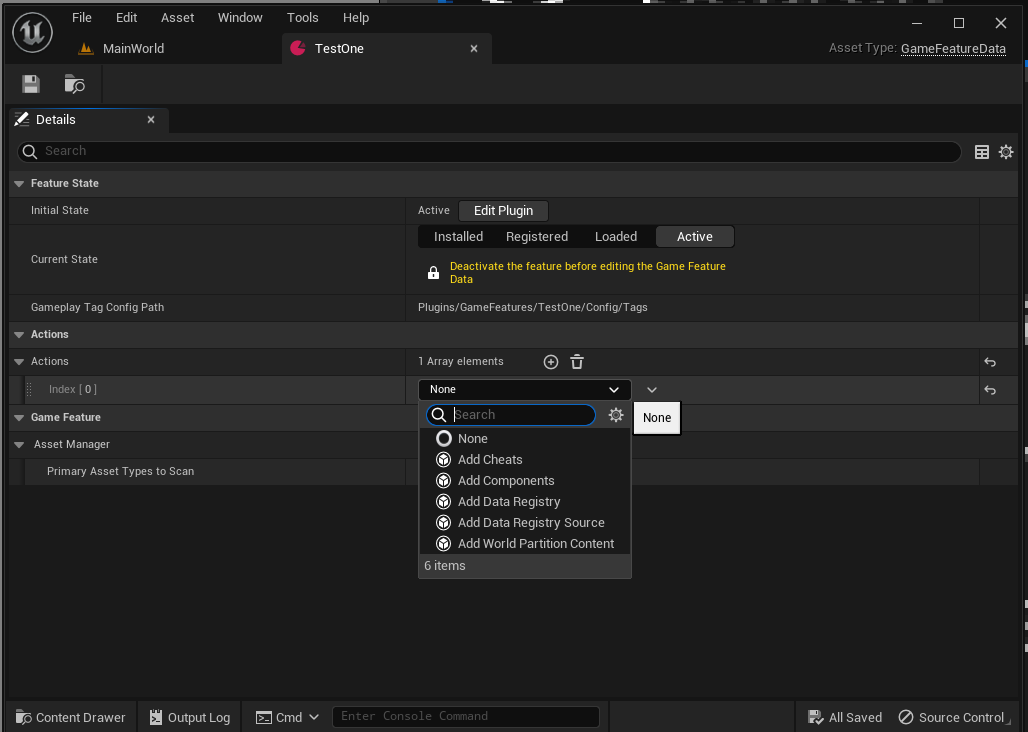
In the next section we will create a new plugin which adds more actions to the list.
Creating the GameFeatureActions Plugin
I have created a git repository for the GameFeatureActions plugin which contains mostly files from the Valley of the Ancient project. These files, with minor modifications, are also used in the Lyra project. The repository contains:
- classes for actions which can be done from a plugin, such as adding an Input Mapping Context, and
- classes to derive from, such as AModularCharacter, which work with the Game Features Subsystem when adding new components to derived classes.
I have put them in a git repository purely to make them easier to access for this learning exercise. They remain (c) Epic Games.
This plugin contains more classes which extend UGameFeatureAction:
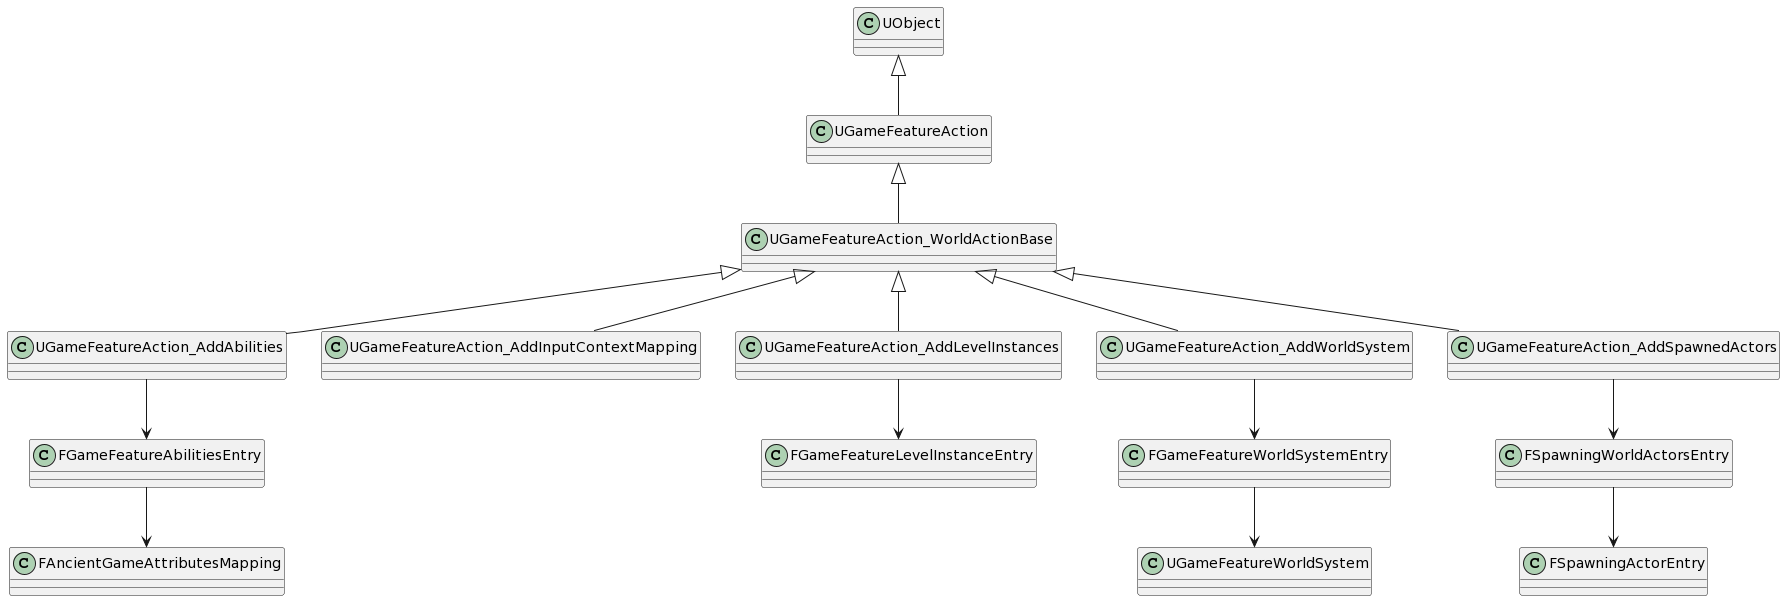
When the GameFeatureActions plugin is enabled you can see from the below image that it adds more actions to the dropdown list of action types:
The process of creating the GameFeatureActions plugin is:
-
open the StackOBot project in the Unreal Editor
-
enable these plugins (if they are not enabled then the new GameFeatureActions plugin will not compile):
- "Game Features"
- "Gameplay Abilities"
- "Modular Gameplay"
-
add a C++ class which we will later delete, this is just to convert it from a blueprint project to a C++ project (use Tools -> New C++ Class, derived from None, any name will do)
-
exit the Unreal editor
-
to clone the git repository which contains the files for the GameFeatureActions plugin either:
(1) if the StackOBot game is not contained in a git repository, then just clone the GameFeatureActions repository into the Plugins directory like this:
cd StackOBot\Plugins git clone git@github.com:JohnJFarrow/GameFeatureActions.git
(2) if the StackOBot game is contained in a git repository, then add the GameFeatureActions repository as a submodule like this:
cd StackOBot\Plugins git submodule add git@github.com:JohnJFarrow/GameFeatureActions.git
-
in Windows Explorer right-click the StackOBot.uproject and Generate Visual Studio project files
-
open the project in Visual Studio (by double-clicking the .sln file)
Creating a Test Plugin
Here we create a new plugin which contains:
- an Input Mapping Context which connects a keyboard input to an Input Action which already exists in the base StackOBot game
- a data asset containing an action which activates the new Input Mapping Context while the plugin is active.
If it is not already, open the StackOBot game in the Visual Studio and build and run it.
Create a new plugin by using Edit -> Plugins, click the +Add button near the top left corner, select "Game Feature (Content Only)" as the type of plugin, and name it "Test", as shown here:
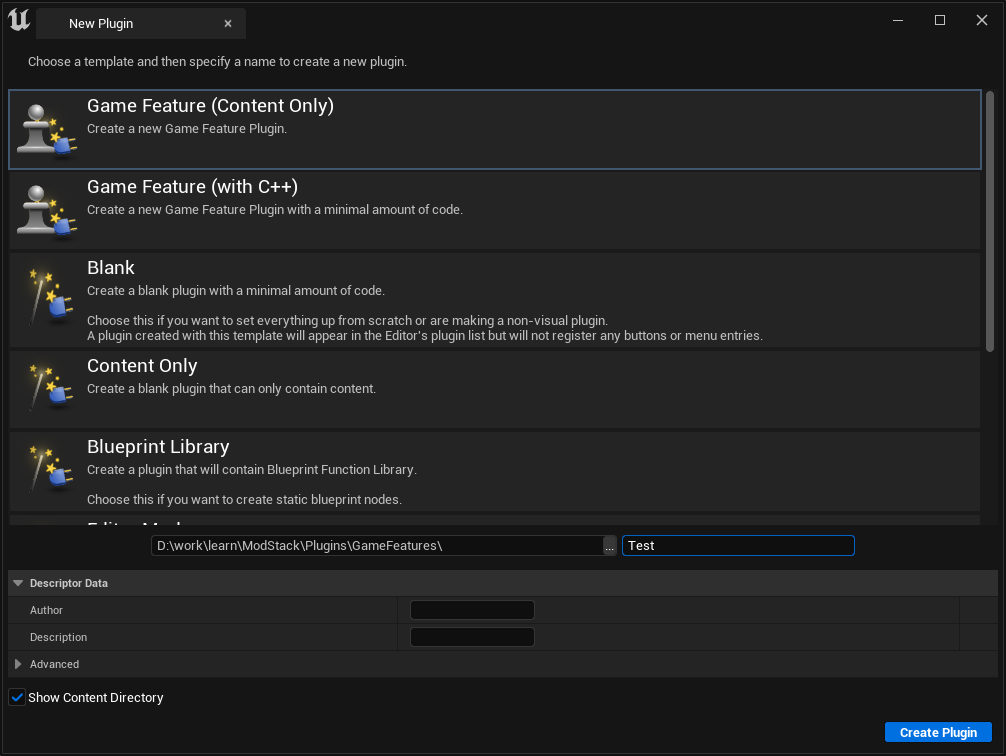
Do not change the path of the plugin, it needs to be in a directory under "Plugins\GameFeatures"
Press the "Create Plugin" button to create the plugin.
The plugin editor window should appear like this:
Press the save button now. With the 5.1 Preview build it is easy to close the editor without saving this asset
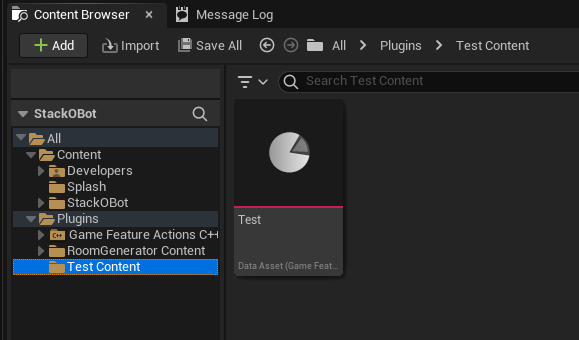
Without closing the Test data asset window, go back to the content browser and locate the new plugin, it should look something like this:
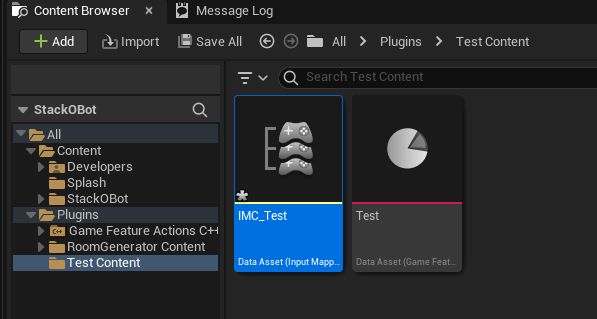
Right click in the content area and select Input -> Input Mapping Context to create a new Input Mapping Context in the plugin, name it "IMC_Test". The content browser should now look like this:
Edit IMC_Test and add an input mapping so the IA_Jump action is performed when then user presses the "U" key. It should look like this:

Save and close the input mapping.
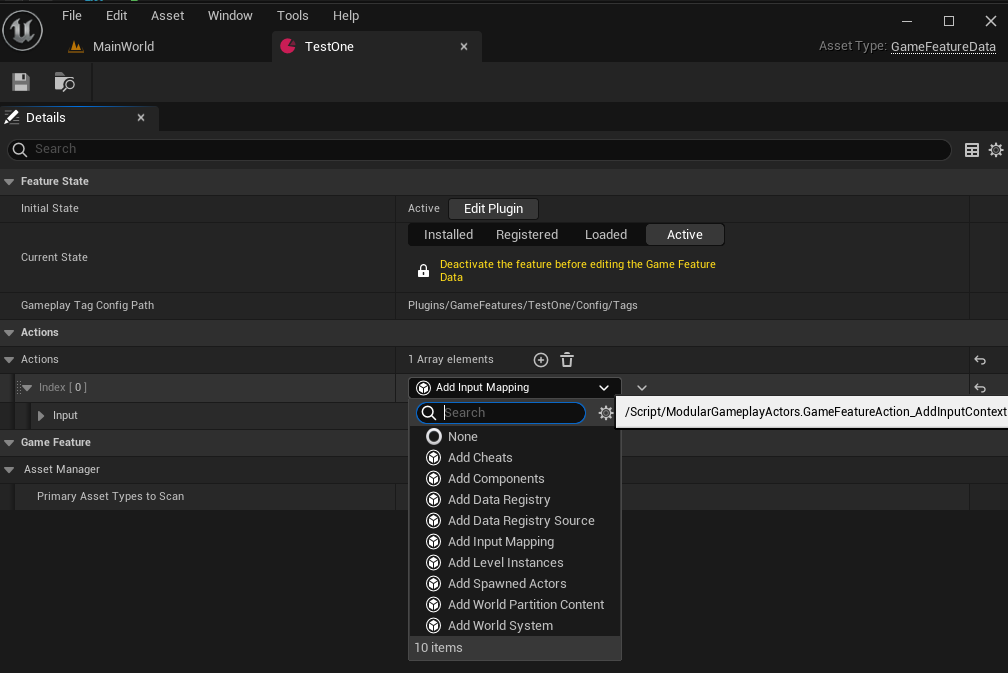
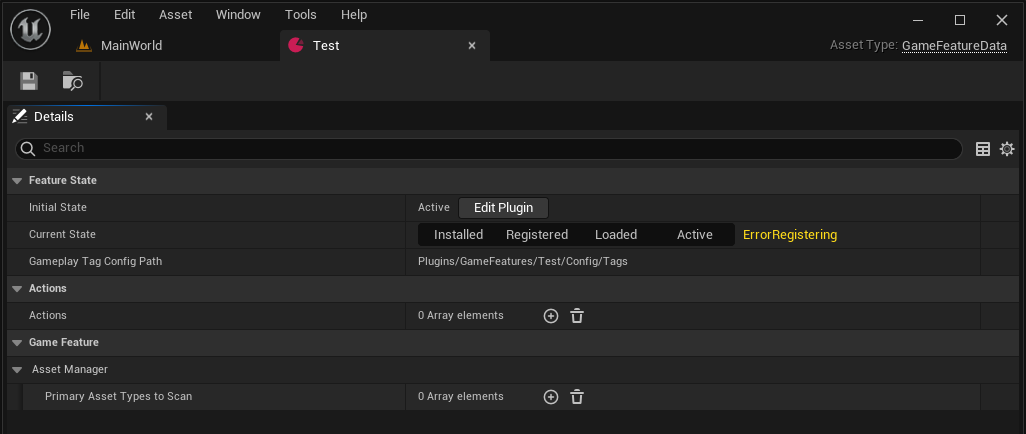
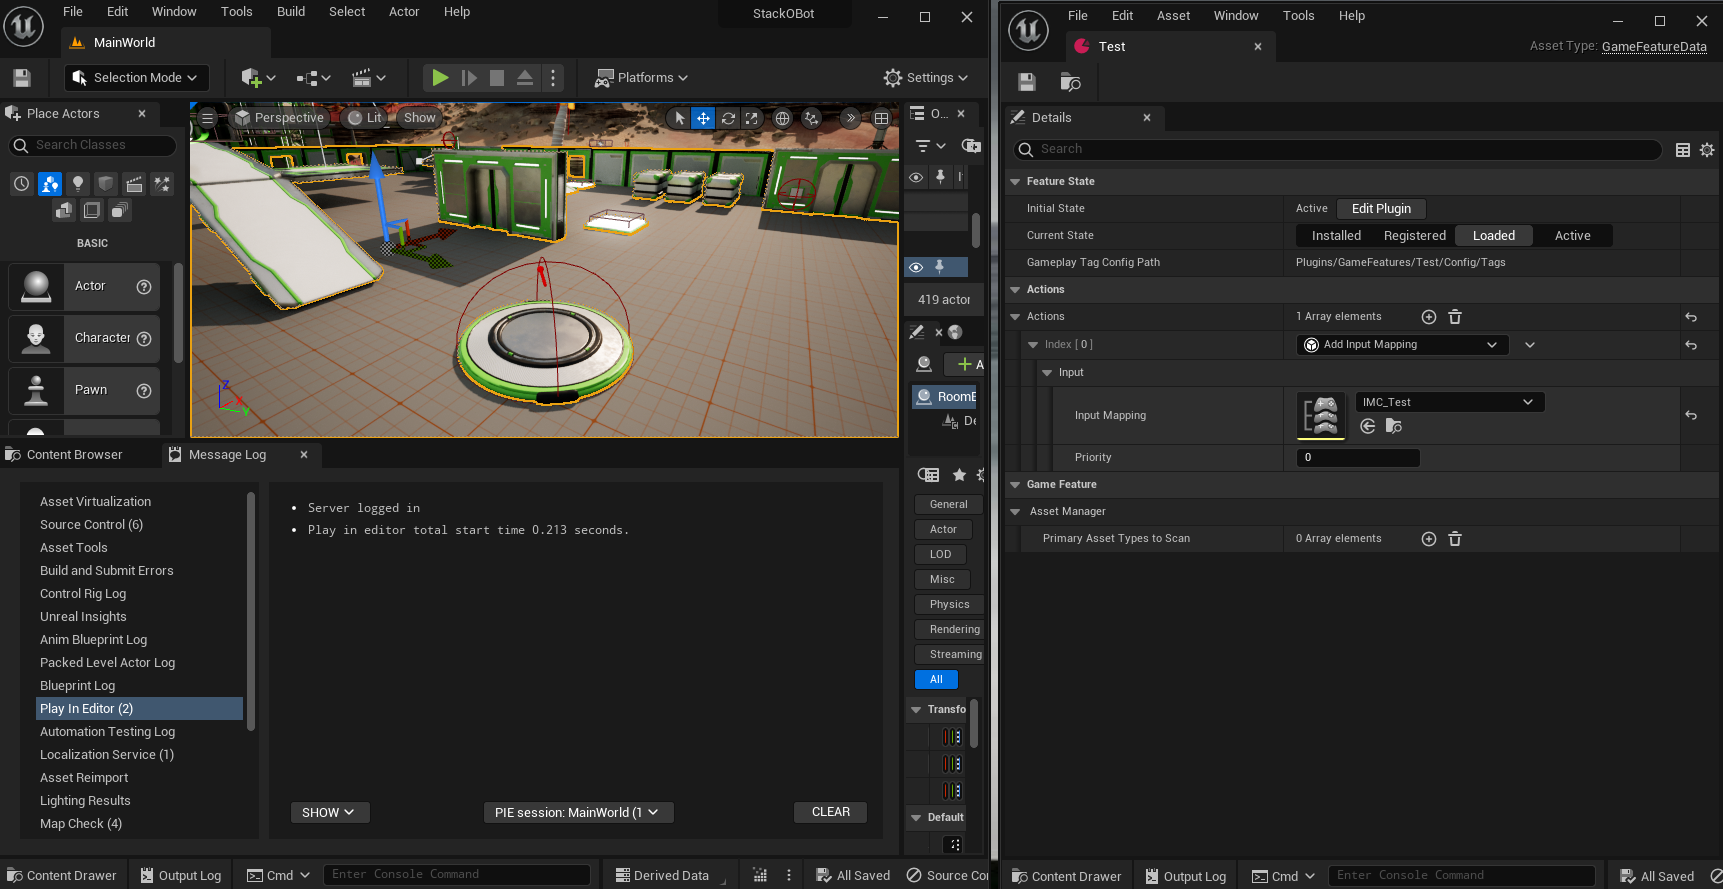
Go back to the Test data asset window and
- add an action which will activate the IMC_Test Input Mapping Context when the plugin is activated
- change the Current State property to "Loaded"
It should now look like this:
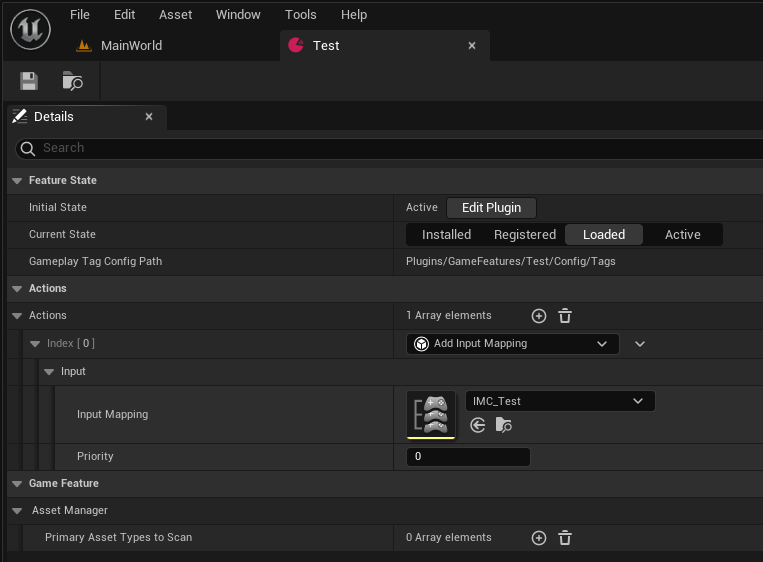
Save the Test data asset.
Testing
To test if this works drag the Test data asset window to the right of the main editor window like this:
You then be able to press Play in the editor and move the robot around. The spacebar will make the robot jump but the "U" key will not.
Alt-Tab to the Test data asset window and change the "Current State" property from whatever it is to "Active". This will load the plugin and activate the IMC_Test Input Mapping Context.
Alt-Tab back to the editor window, the robot should now jump when you press the "U" key.
This shows that the plugin has loaded and the "Add Input Mapping" action has been executed to activate the IMC_Test Input Mapping Context.
Similarly if you change the "Current State" property from "Active" back to "Loaded" the "U" key will no longer make the robot jump.
How Does It Work?
Broadly speaking this is what happens when processing an action to add an Input Mapping Context from a plugin:
UGameFeaturePluginStateMachine::UpdateStateMachine()is called by the engine when any plugin is changed to enabled
-
UGameFeaturePluginStateMachine::UpdateStateMachine()callsUGameFeaturesSubsystem::OnGameFeatureActivating() -
UGameFeaturesSubsystem::OnGameFeatureActivatingcallsUGameFeatureAction_AddInputContextMapping::OnGameFeatureActivating()
The UGameFeaturesSubsystem in the engine knows about our UGameFeatureAction_AddInputContextMapping because it maintains a list of plugins:
TMap<FGameFeaturePluginIdentifier, TObjectPtr<UGameFeaturePluginStateMachine>> GameFeaturePluginStateMachines;
from which it can retrieve the actions:
UGameFeaturePluginStateMachine* UGameFeaturesSubsystem::FindOrCreateGameFeaturePluginStateMachine(const FString& PluginURL)
{
  if (UGameFeaturePluginStateMachine* ExistingStateMachine = FindGameFeaturePluginStateMachine(PluginURL))
  {
    return ExistingStateMachine;
  }

  UGameFeaturePluginStateMachine* NewStateMachine = NewObject<UGameFeaturePluginStateMachine>(this);
  GameFeaturePluginStateMachines.Add(PluginURL, NewStateMachine);
  NewStateMachine->InitStateMachine(PluginURL);
  return NewStateMachine;
}
UGameFeatureAction_AddInputContextMapping::OnGameFeatureActivating()calls it's base class to loop through all world contexts and callAddToWorld()on each of them:
void UGameFeatureAction_WorldActionBase::OnGameFeatureActivating()
{
  GameInstanceStartHandle = FWorldDelegates::OnStartGameInstance.AddUObject(this,
       &UGameFeatureAction_WorldActionBase::HandleGameInstanceStart);

  // Add to any worlds with associated game instances that have already been initialized
  for (const FWorldContext& WorldContext : GEngine->GetWorldContexts())
  {
    AddToWorld(WorldContext);
  }
}
AddToWorld()does this:
void UGameFeatureAction_AddInputContextMapping::AddToWorld(const FWorldContext& WorldContext)
{
	UWorld* World = WorldContext.World();
	UGameInstance* GameInstance = WorldContext.OwningGameInstance;

	if ((GameInstance != nullptr) && (World != nullptr) && World->IsGameWorld())
	{
		if (UGameFrameworkComponentManager* ComponentMan =
		      UGameInstance::GetSubsystem<UGameFrameworkComponentManager>(GameInstance))
		{
			if (!InputMapping.IsNull())
			{
				UGameFrameworkComponentManager::FExtensionHandlerDelegate AddAbilitiesDelegate =
					UGameFrameworkComponentManager::FExtensionHandlerDelegate::CreateUObject(
						this, &UGameFeatureAction_AddInputContextMapping::HandleControllerExtension);

				TSharedPtr<FComponentRequestHandle> ExtensionRequestHandle =
					ComponentMan->AddExtensionHandler(APlayerController::StaticClass(), AddAbilitiesDelegate);

				ExtensionRequestHandles.Add(ExtensionRequestHandle);
			}
		}
	}
}
The key line is:
	TSharedPtr<FComponentRequestHandle> ExtensionRequestHandle =
		ComponentMan->AddExtensionHandler(APlayerController::StaticClass(), AddAbilitiesDelegate);
AddExtensionHandler()does this:
TSharedPtr<FComponentRequestHandle> UGameFrameworkComponentManager::AddExtensionHandler(
			const TSoftClassPtr<AActor>& ReceiverClass, FExtensionHandlerDelegate ExtensionHandler)
{
	FComponentRequestReceiverClassPath ReceiverClassPath(ReceiverClass);
	FExtensionHandlerEvent& HandlerEvent = ReceiverClassToEventMap.FindOrAdd(ReceiverClassPath);

	// This is a fake multicast delegate using a map
	FDelegateHandle DelegateHandle(FDelegateHandle::EGenerateNewHandleType::GenerateNewHandle);
	HandlerEvent.Add(DelegateHandle, ExtensionHandler);

	if (UClass* ReceiverClassPtr = ReceiverClass.Get())
	{
		UGameInstance* LocalGameInstance = GetGameInstance();
		if (ensure(LocalGameInstance))
		{
			UWorld* LocalWorld = LocalGameInstance->GetWorld();
			if (ensure(LocalWorld))
			{
				for (TActorIterator<AActor> ActorIt(LocalWorld, ReceiverClassPtr); ActorIt; ++ActorIt)
				{
					if (ActorIt->IsActorInitialized())
					{
						ExtensionHandler.Execute(*ActorIt, NAME_ExtensionAdded);
					}
				}
			}
		}
	}

	return MakeShared<FComponentRequestHandle>(this, ReceiverClass, DelegateHandle);
}
The key line is:
TActorIterator<AActor> ActorIt(LocalWorld, ReceiverClassPtr); ActorIt; ++ActorIt)
which finds all the actors in the world of the required class. In the case of adding an Input Mapping Context
it finds all the actors of the PlayerController class and invokes the ExtensionHandler on each actor:
ExtensionHandler.Execute(*ActorIt, NAME_ExtensionAdded);
The invocation of the extension handler calls UGameFeatureAction_AddInputContextMapping::HandleControllerExtension()
which calls InputSystem->AddMappingContext() to add the Input Mapping Context
Reference
- Epic Gameplay Tags
- Old Wiki Article: Gameplay Abilities and You
- Unreal Forums: Comprehensive Gameplay Abilities Analysis
- Unreal Forums: Gameplay Abilities and Weapon Firing
- Tranek GAS Documentation
- Unreal Forums: A holistic look at replicated movement
Feedback
Please leave any feedback about this article here