Landscapes - Using Real Location Data
This discusses making large Unreal landscapes using data from a real-world location.
Background
This is part of a series of articles about Landscapes, these articles include:
Landscapes - Building GDAL
Landscapes - Material Concepts
Landscapes - Nanite Tessellation
Landscapes - Using Real Location Data
Landscapes - World Partition and Tiling
Approach
This approach taken here is to use a website which provides geographical data about real-world locations to get data about a location, then use tools from the GDAL translator library to convert that data into a form which Unreal Engine can use to create a landscape.
We are only interested in height data, not in other data such as materials or streets and towns.
The process described here uses tools from the GDAL library, instructions on building them can be found at Nanite Landscape Materials - GDAL
Get Coordinates
We can either get latitude and longitude coordinates from any world map, or get them from a website. Here we use USGS
Steps:
- open https://earthexplorer.usgs.gov/ in a web browser
- enable display of latitude and longitude coordinates by clicking the icon in the top left of the map and making sure "Lat/Lng Overlay" is checked:
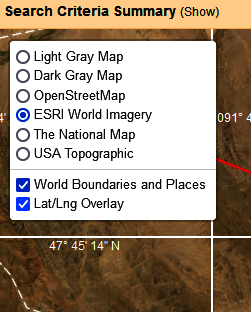
- click the Decimal tab on the left to change the displayed map coordinates to decimals which we need for the OpenTopography API:
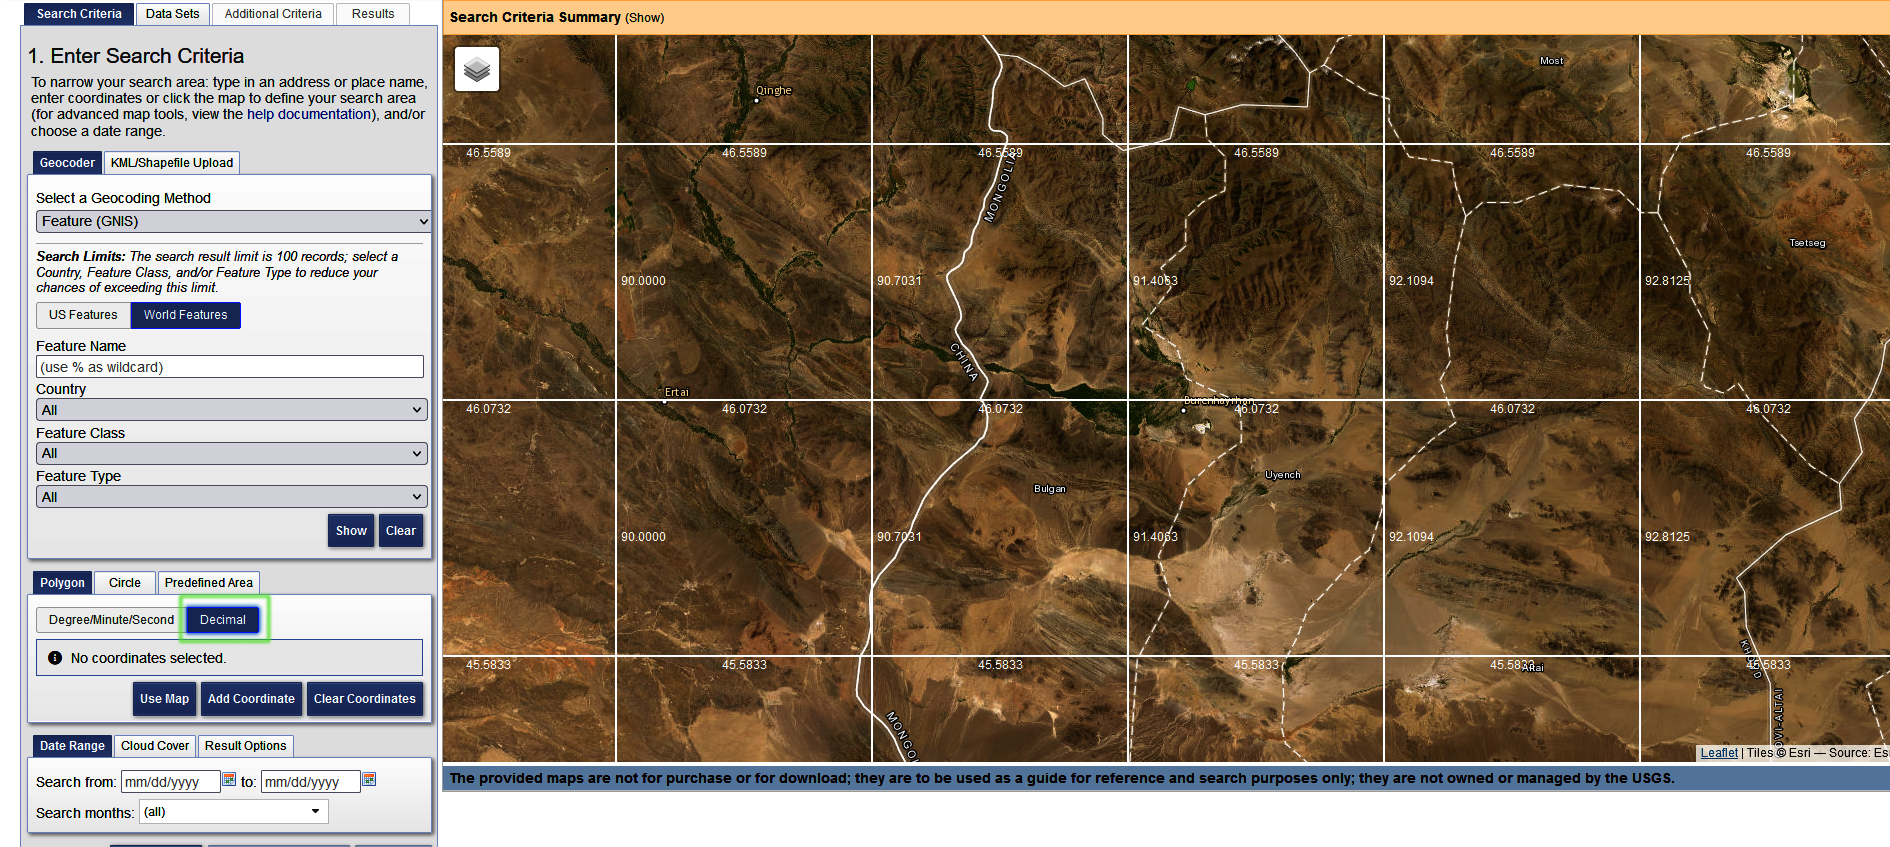
Find an interesting bit of terrain and note the coordinates of the top left and bottom right. For example this green square:
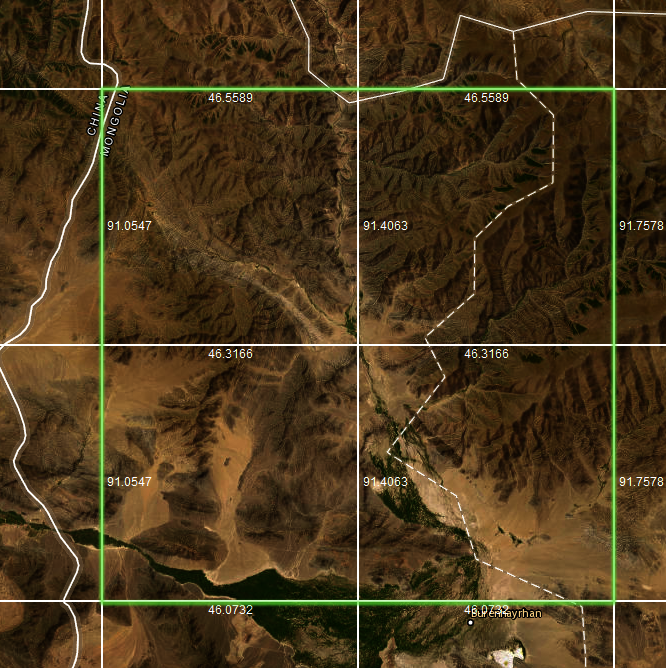
has coordinates:
| Dimension | Latitude | Longitude |
|---|---|---|
| Top Left | 46.5589 | 91.0547 |
| Bottom Right | 46.0732 | 91.5758 |
Data
We will be getting data from OpenTopography(https://opentopography.org/) by calling their API from python. The API calls require an API key which can be obtained for free by pressing the "Request an API Key" button on their web page.
We will be using the OpenTopography globaldem API and calling it from python
Setting up Python
Use the commands to make a python virtual environment:
mkdir demo
cd demo
python -m venv myvenv
myvenv\Scripts\activate
pip install requests
pip install tqdm
Create a file called fetch.py and insert this code, then replace the YOUR_API_KEY string with the API key which OpenTopography emailed you:
import os
import sys
import requests

# OpenTopography API URL for global datasets (e.g., SRTM, ALOS)
API_URL = "https://portal.opentopography.org/API/globaldem"

# Define parameters (Modify as needed)
params = {
    "demtype": "NASADEM", # "SRTMGL1",  # Options: SRTMGL1, SRTMGL3, ALOS, NASADEM
    "west": 91.0547,  # Min Longitude
    "south": 46.0732,   # Min Latitude
    "east": 91.5758,  # Max Longitude
    "north": 46.5589,   # Max Latitude
    "outputFormat": "GTiff",  # GeoTIFF format
    "API_Key" : "YOUR_API_KEY"
}

# Send request to OpenTopography API
response = requests.get(API_URL, params=params)

if response.status_code == 200:

    filename:str = "demdata.tif"

    # Download the file
    with open(filename, "wb") as file:
        file.write(response.content)

    print(f"DEM saved as {filename}")

else:
    print("Failed to fetch data:", response.text)
Change the params object shown below to your chosen map coordinates and your API key:
params = {
    "demtype": "NASADEM", # "SRTMGL1",  # Options: SRTMGL1, SRTMGL3, ALOS, NASADEM
    "west": 91.0547,  # Min Longitude
    "south": 46.0732,   # Min Latitude
    "east": 91.5758,  # Max Longitude
    "north": 46.5589,   # Max Latitude
    "outputFormat": "GTiff",  # GeoTIFF format
    "API_Key" : "YOUR_API_KEY"
}
Getting Data
Run the python command
python fetch.py
You should see a message like:
DEM saved as demdata.tif
This file is in geotiff format.
Linux/WSL
Alternatively if you are on Linux or WSL you can use a curl command like this one:
curl -X 'GET' \
  'https://portal.opentopography.org/API/globaldem?demtype=NASADEM&south=50&north=50.1&west=14.35&east=14.6&outputFormat=GTiff&API_Key=demoapikeyot2022' \
  --output demdata.tif -H 'accept: */*'
Geotiff Format
To see what is in the file run the gdalinfo -mm command
like this:
gdalinfo -mm demdata.tif
You should see output describing the file contents like this:
Driver: GTiff/GeoTIFF
Files: demdata.tif
Size is 1876, 1749
Coordinate System is:
GEOGCRS["WGS 84",
    ENSEMBLE["World Geodetic System 1984 ensemble",
        MEMBER["World Geodetic System 1984 (Transit)"],
        MEMBER["World Geodetic System 1984 (G730)"],
        MEMBER["World Geodetic System 1984 (G873)"],
        MEMBER["World Geodetic System 1984 (G1150)"],
        MEMBER["World Geodetic System 1984 (G1674)"],
        MEMBER["World Geodetic System 1984 (G1762)"],
        MEMBER["World Geodetic System 1984 (G2139)"],
        MEMBER["World Geodetic System 1984 (G2296)"],
        ELLIPSOID["WGS 84",6378137,298.257223563,
            LENGTHUNIT["metre",1]],
        ENSEMBLEACCURACY[2.0]],
    PRIMEM["Greenwich",0,
        ANGLEUNIT["degree",0.0174532925199433]],
    CS[ellipsoidal,2],
        AXIS["geodetic latitude (Lat)",north,
            ORDER[1],
            ANGLEUNIT["degree",0.0174532925199433]],
        AXIS["geodetic longitude (Lon)",east,
            ORDER[2],
            ANGLEUNIT["degree",0.0174532925199433]],
    USAGE[
        SCOPE["Horizontal component of 3D system."],
        AREA["World."],
        BBOX[-90,-180,90,180]],
    ID["EPSG",4326]]
Data axis to CRS axis mapping: 2,1
Origin = (91.054583333369237,46.559027777775860)
Pixel Size = (0.000277777777778,-0.000277777777778)
Metadata:
  AREA_OR_POINT=Area
Image Structure Metadata:
  LAYOUT=COG
  COMPRESSION=LZW
  INTERLEAVE=BAND
Corner Coordinates:
Upper Left  (  91.0545833,  46.5590278) ( 91d 3'16.50"E, 46d33'32.50"N)
Lower Left  (  91.0545833,  46.0731944) ( 91d 3'16.50"E, 46d 4'23.50"N)
Upper Right (  91.5756944,  46.5590278) ( 91d34'32.50"E, 46d33'32.50"N)
Lower Right (  91.5756944,  46.0731944) ( 91d34'32.50"E, 46d 4'23.50"N)
Center      (  91.3151389,  46.3161111) ( 91d18'54.50"E, 46d18'58.00"N)
Band 1 Block=256x256 Type=Int16, ColorInterp=Gray
    Computed Min/Max=1132.000,3205.000
  NoData Value=-32768
From this we can see several notable things:
Driver: GTiff/GeoTIFFit is a file in geotiff formatSize is 1876, 1749this is the file resolution in pixels (more on that below)GEOGCRS["WGS 84"the data is in WGS 84 Coordinate Reference SystemPixel Size = (0.000277777777778, -0.000277777777778)ID["EPSG",4326]]the data is in EPSG:4326 format which stores values in degrees
The proj.db file
If you see this warning near the top of the gdalinfo output:
Warning 1: PROJ: proj_create_from_database: Cannot find proj.db
your PROJ_LIB environment variable is not set correctly. This needs to be set correctly (as described here) or the data values extracted from the geotiff data will be incorrect.
If you get this error message, you must fix it before proceeding. Some gdal commands will appear to run without fixing this but the file contents will be incorrect.
Data Dimensions
Each pixel in the demdata.tif file represents data about a specific point. The points are separated by some physical distance. That distance varies with the source of the data, for example Shuttle Radar Topography Mission (SRTM) data is a 30m resolution, so the distance between each point is 30m. Other data sources might measure distances in different ways, for example in degrees.
The pixel size from the gdalinfo command is (0.000277777777778, -0.000277777777778), this means
one pixel in demdata.tif represents 0.000277777777778 of a unit, where the unit depends
on the coordinate system the file is in. From the gdalinfo command above the coordinate
system is "WGS 84" and the measurements are in EPSG:4326 format.
EPSG:4326 stores measurements as degrees, so each pixel in the demdata.tif file is 0.000277777777778 of a degree. A degree at the equator is around 111,320 metres so each pixel is 0.000277777777778 x 111,320 is approximately 30.87 metres. This makes sense as we are probably getting data from a DEM sampled at 30m intervals.
The negative value in the pixel size (0.000277777777778, -0.000277777777778) indicates the image follows the standard top-down orientation, where Y values decrease as you move downward in the raster (north to south).
Converting to Meters
The gdalinfo output contains this:
ID["EPSG",4326]
This tells is the data uses EPSG:4326 format so the data is stored in degrees. When the data its stored in degrees we can convert it to metres with this command:
gdalwarp -t_srs EPSG:3857 -dstnodata -9999 -ot Float32 -r cubic demdata.tif demdata30m.tif -wo NUM_THREADS=ALL_CPUS -overwrite
In this command:
-t_srs EPSG:3857EPSG:3857 is the ESPG 3857 system which stores measurements in meters-dstnodata -9999for points with no data use -9999-ot Float32output float values-r cubicuse cubic resampling-wo NUM_THREADS=ALL_CPUSuse all available CPU cores, makes it go faster-overwriteoverwrite the output file, so we can run the command more than once
Note that cubic is only one of several interpolation options listed at GDAL Documentation
and depending on your terrain different options may produce better results.
This takes a few seconds depending on how many CPU cores you have and outputs this:
Creating output file that is 1527 x 2061
Processing demdata.tif [1/1] : 0...10...20...30...40...50...60...70...80...90...100 - done.
Looking at the content of demdata30m.tif:
gdalinfo -mm demdata30m.tif
Size is 1527, 2061
Pixel Size = (37.995095064490428, -37.995095064490428)
Computed Min/Max=1131.897,3204.311
The pixel size is about 38m, so now we have a file demdata30m.tif which one sample per meter 38 m and is 1527x38m x 2061x38m, or about 58km x 78 km.
Making a Heightmap
In a 16 bit heightmap the values stored in the PNG file for each X, Y position range from 0 .. 65535. At the same time as we create the heightmap we want to scale whatever the height values are in the meters.tif to be in this range. In this case the height values are shown in the output above:
Computed Min/Max=1131.897,3204.311
We can use the gdal_translate command to create a PNG heightmap (which Unreal can read) from the geotiff data like this:
gdal_translate -ot UInt16 -scale 1131.897 3204.311 0 65535 -of PNG demdata30m.tif heightmap30m.png
In this command:
-ot UInt16sets the PNG format to 16 bits--scale 1131.897 3204.311 0 65535scales the height values as described above-of PNGsets the output format to PNG
Unreal accepts only certain heightmap sizes. Some of the acceptable sizes are shown here:
| Heightmap Size | Landscape Components | Quads per Section | Sections per Component |
|---|---|---|---|
| 8129 x 8129 | 127x127 | 4 (2x2) | 254x254 |
We want to end up with a file with 1 pixel per meter. We could get the demdata30m.tif file and convert that to a 1m resolution but that introduces steps in the terrain, it is faster and produces a better result if we do the following:
- create a heightmap from the tiff file
gdal_translate -ot UInt16 -scale 1131.897 3204.311 0 65535 -of PNG demdata30m.tif heightmap30m.png
- convert the heightmap from 30m resolution to 1m resolution BUT first we want to make it smaller; this is a slow process and we don't want to do it on a 58km x 78 km file if we only want an 8km x 8k region of that file. A pixel in the heightmap30m.png is approximately 38m, so we want 8129/38 = 213.9 pixels, so use a larger number like 220 pixels.
gdal_translate -srcwin 0 0 220 220 -ot UInt16 heightmap30m.png heightmap30m_220.png
In this command:
-srcwin 0 0 220 220defines the source window. The first two values are the x y position of the square and the second two are the width and height.
now we can convert the smaller heightmap to meters:
gdalwarp -t_srs EPSG:3857 -dstnodata -9999 -tr 1 1 -ot Uint16 -r cubic heightmap30m_220.png heightmap1m.png -wo NUM_THREADS=ALL_CPUS -overwrite
- now the file is in meters we can extract only the exact area we need from the 1m heightmap file
gdal_translate -srcwin 0 0 8129 8129 -ot UInt16 heightmap1m.png heightmap1m_8192.png
In this command:
-srcwin 0 0 8129 8129defines the source window. The first two values are the x y position of the square and the second two are the width and height.
Importing into Unreal
Now:
- create a new Unreal 5.5.2 project
- create a new level based on the "basic" template so that world partitioning is disabled
- delete the floor object
- optionally delete the VolumetricCloud and ExponentialHeightFog objects to make the view clearer
Press Shift-2 to enter landscape mode, click the "Import from File" tab, and set the Heightmap File property to heightmap.png. The window now looks like this:
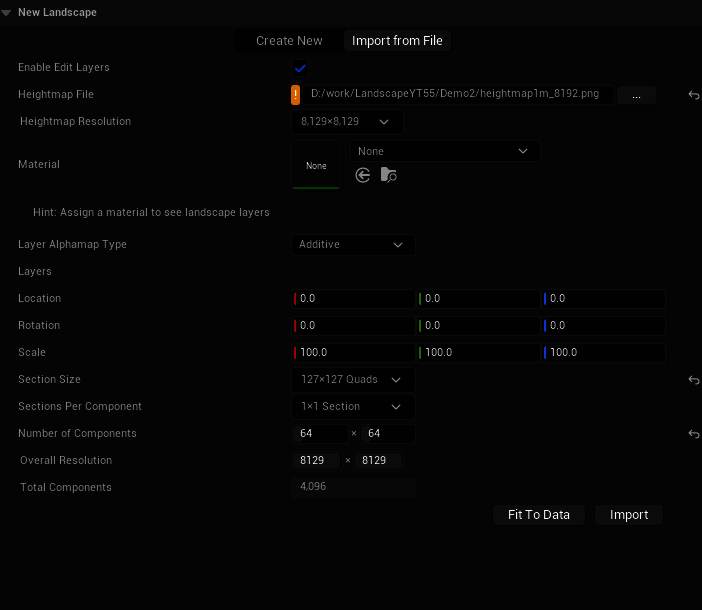
- the Heightmap Resolution has been read from the file and is 8129 x 8129
- the Scale is 100 x 100 x 100
The Scale X and Y values are correct, the value of 100 converts the meter resolution of the heightmap to Unreal centimeter units.
The Scale Z value controls the vertical scaling. According the Epic here and here the formula for Z is this:
(Max height of your heightmap in meters) x (100 to convert to centimeters) x 0.001953125.
Therefore for our heightmap the value is this:
3204.311 * 100 * 0.001953125 = 625.8419921875
So set the Scale Z value to 625.8419921875 like this, change the other settings to match, and press the Import button:
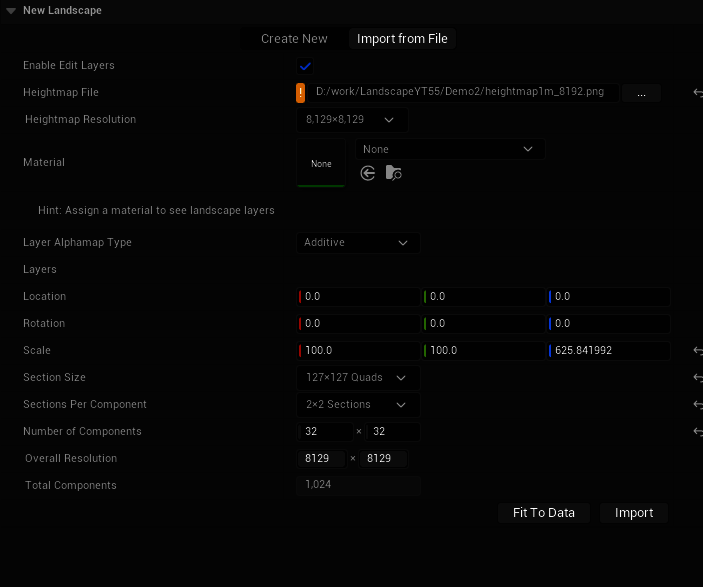
Press the Import button to create the landscape - it should only take a few minutes.