Landscapes - World Partition and Tiling
This discusses making large Unreal landscapes using data from a real-world location using World Partition to support larger maps.
Background
This is part of a series of articles about Landscapes, these articles include:
Landscapes - Building GDAL
Landscapes - Material Concepts
Landscapes - Nanite Tessellation
Landscapes - Using Real Location Data
Landscapes - World Partition and Tiling
Approach
Following on from the previous article which showed how to download DEM data for real locations and how to make a heightmap to create a landscape in Unreal, this article looks at World Partition works and how we can import larger heightmaps.
The process described here uses tools from the GDAL library, instructions on building them can be found at Nanite Landscape Materials - GDAL
Data
We will be reusing the demdata.tif file we downloaded from USGS in the previous article. This covers an area approximately 58km by 78km.
Conversion to meters
This command creates a file demdata30m.tif which is the DEM data converted from degrees to meters, with one pixel approximately every 38m.
gdalwarp -t_srs EPSG:3857 -dstnodata -9999 -ot Float32 -r cubic demdata.tif demdata30m.tif -wo NUM_THREADS=ALL_CPUS -overwrite
World Partition
World Partition is described here. It breaks the level into regions and:
- dynamically loads content into memory for the regions which the player can see
- dynamically loads HLOD lower resolution actors for content which is distant from the player
As the player moves actors are streamed in and out to try and reduce memory use.
A landscape created with World Partition is divided into regions and each region has some number of LandscapeStreamingProxy objects which manage streaming of that part of the landscape.
The World Partition Editor is a window which displays a 2d view minimap so you can load and unload regions at will as you work on them.
The minimap is created using the Build | Build Minimap menu option or the Build | Minimap button on the World Partition Editor window.
Hierarchical Levels of Detail (HLODs) enabled Unreal to display less-detailed versions of distant objects. They are built using the Build | Build HLODS menu or the Build | HLODs button on the World Partition Editor window.
Stretching a Heightmap
From the previous article we have the file heightmap1m_8192.png which has samples every 1m and a resolution of 8192x8192, so covering 8km x 8km.
If we don't want to retain fidelity to the real-world terrain, we can create a larger terrain by importing it with large scale values.
The values we used before were:
If we double the X and Y scale values the terrain will be twice as large, i.e. 16km x 16km.
This does the effect that when compared to a person, all terrain features have double in size, but it's a simple way of creating a large terrain.
If we do want to create a map from real world data with stretching it, we can use tiles.
Tiles
A large heightmap can be broken down into tiles, each represented by a separate file. Some larger heightmaps can only be loaded if they are broken into tiles (see the table below).
Using the demdata.tif file from the previous article, in which the measurements are degrees, we can create the equivalent file in ~30m resolution using this command:
gdalwarp -t_srs EPSG:3857 -dstnodata -9999 -ot Float32 -r cubic demdata.tif demdata30m.tif -wo NUM_THREADS=ALL_CPUS -overwrite
We can get the min and max heights from demdata30.tif using this command:
gdalinfo -mm demdata30m.tif
Computed Min/Max=1131.897,3204.311
We can make a heightmap, still with ~30m resolution, with this command:
gdal_translate -ot UInt16 -scale 1131.897 3204.311 0 65535 -of PNG demdata30m.tif heightmap30m.png
One way to split the heightmap at 1m measurements is to convert it from 30m to 1m resolution using this command:
gdalwarp -t_srs EPSG:3857 -dstnodata -9999 -tr 1 1 -ot Uint16 -r bilinear heightmap30m.png heightmap1m.png -wo NUM_THREADS=ALL_CPUS -overwrite
The bilinear parameter determines how gdalwarp will position the new points it inserts
every meter between the existing 30m points. There are many other options
on how to do this, they are listed on this page
Tile Sizes
We need have a way of working out what tile size we should use. Only certain tile sizes work with world partition.
For example, if we decide to have a tile size of 2017m, and a landscape of 5 x 5 tiles, so a total of 25 tiles.
The total heightmap resolution is 5 x 2017 = 10085 x 10085
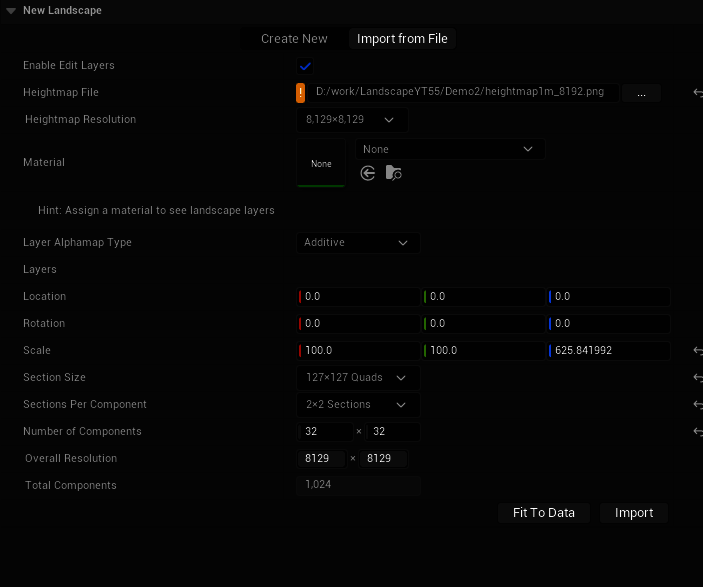
The landscape import UI will suggest these values:
- Section size 255x255 quads
- Sections per component 2x2 sections
- Number of components 20 x 20
- Overall resolution 10201 x 10201
- Total components 400
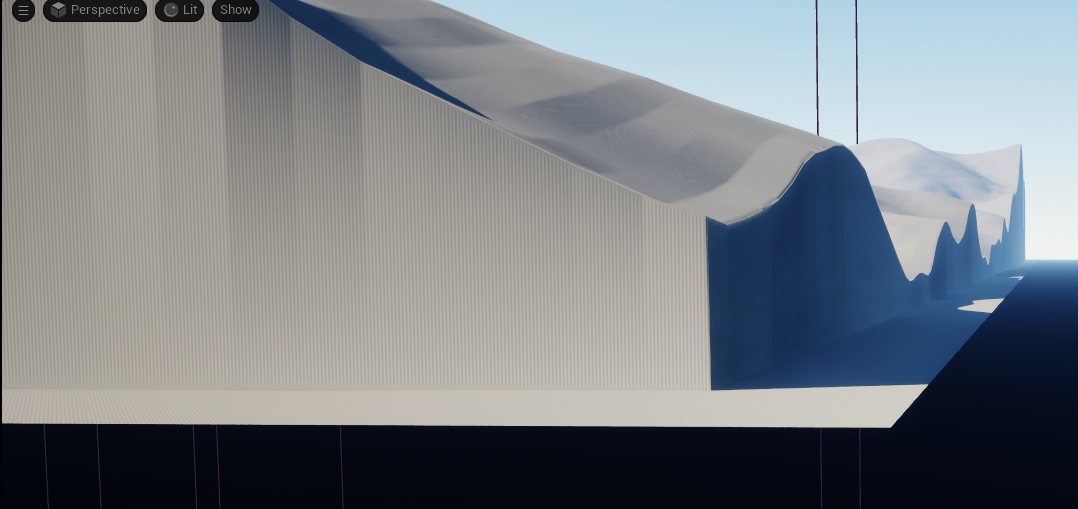
The overall resolution is 10201, but the heightmap is 10085 so the landscape will be bigger than the heightmap. Pixels on two edges of the heightmap between the edge of the tiles and the end of the landscape will be filled with zeros, producing an edge like this:
To make the tile size match the landscape size we need to use a heightmap size which both:
- has resolution = ( 511 * N ) + ( N - 1 )
- can be divided into a specified number of tiles, i.e. is not a prime number
- can be divided into a small number of tiles, for example the resolution 45901 can be divided into 38809 tiles each 233x233 resolution, but we don't want to be making 38809 tiles, it will be too slow to both create and load them.
If we use a python script to generate some possibilities and set a max tile count of 200, we get this table:
| Landscape Size | Num Tiles per side | Tile Width (pixels) | Tile Count | Vertex Count | Needs Tiles | Loadable |
|---|---|---|---|---|---|---|
| 511x511 | 7 | 73 | 49 | 261121 | False | True |
| 2041x2041 | 13 | 157 | 169 | 4165681 | False | True |
| 4081x4081 | 7 | 583 | 49 | 16654561 | False | True |
| 4081x4081 | 11 | 371 | 121 | 16654561 | False | True |
| 5611x5611 | 31 | 181 | 961 | 31483321 | False | True |
| 6631x6631 | 19 | 349 | 361 | 43970161 | False | True |
| 7141x7141 | 37 | 193 | 1369 | 50993881 | False | True |
| 7651x7651 | 7 | 1093 | 49 | 58537801 | False | True |
| 8671x8671 | 13 | 667 | 169 | 75186241 | False | True |
| 8671x8671 | 23 | 377 | 529 | 75186241 | False | True |
| 8671x8671 | 29 | 299 | 841 | 75186241 | False | True |
| 9691x9691 | 11 | 881 | 121 | 93915481 | False | True |
| 11221x11221 | 7 | 1603 | 49 | 125910841 | False | True |
| 12751x12751 | 41 | 311 | 1681 | 162588001 | False | True |
| 14791x14791 | 7 | 2113 | 49 | 218773681 | False | True |
| 15301x15301 | 11 | 1391 | 121 | 234120601 | False | True |
| 15301x15301 | 13 | 1177 | 169 | 234120601 | False | True |
| 16321x16321 | 19 | 859 | 361 | 266375041 | False | True |
| 18361x18361 | 7 | 2623 | 49 | 337126321 | False | True |
| 18361x18361 | 43 | 427 | 1849 | 337126321 | False | True |
| 20401x20401 | 23 | 887 | 529 | 416200801 | False | True |
| 20911x20911 | 11 | 1901 | 121 | 437269921 | False | True |
| 21421x21421 | 31 | 691 | 961 | 458859241 | False | True |
| 21931x21931 | 7 | 3133 | 49 | 480968761 | False | True |
| 21931x21931 | 13 | 1687 | 169 | 480968761 | False | True |
| 23461x23461 | 29 | 809 | 841 | 550418521 | False | True |
| 25501x25501 | 7 | 3643 | 49 | 650301001 | False | True |
| 26011x26011 | 37 | 703 | 1369 | 676572121 | False | True |
| 26011x26011 | 19 | 1369 | 361 | 676572121 | False | True |
| 26521x26521 | 11 | 2411 | 121 | 703363441 | False | True |
| 28561x28561 | 13 | 2197 | 169 | 815730721 | False | True |
| 29071x29071 | 7 | 4153 | 49 | 845123041 | False | True |
| 32131x32131 | 11 | 2921 | 121 | 1032401161 | False | True |
| 32131x32131 | 23 | 1397 | 529 | 1032401161 | False | True |
| 32641x32641 | 7 | 4663 | 49 | 1065434881 | False | True |
| 33661x33661 | 41 | 821 | 1681 | 1133062921 | True | True |
| 35191x35191 | 13 | 2707 | 169 | 1238406481 | True | True |
| 35701x35701 | 19 | 1879 | 361 | 1274561401 | True | True |
| 36211x36211 | 7 | 5173 | 49 | 1311236521 | True | True |
| 37231x37231 | 31 | 1201 | 961 | 1386147361 | True | True |
| 37741x37741 | 11 | 3431 | 121 | 1424383081 | True | True |
| 38251x38251 | 29 | 1319 | 841 | 1463139001 | True | True |
| 39781x39781 | 7 | 5683 | 49 | 1582527961 | True | True |
| 40291x40291 | 43 | 937 | 1849 | 1623364681 | True | True |
| 41821x41821 | 13 | 3217 | 169 | 1748996041 | True | True |
| 43351x43351 | 7 | 6193 | 49 | 1879309201 | True | True |
| 43351x43351 | 11 | 3941 | 121 | 1879309201 | True | True |
| 43861x43861 | 23 | 1907 | 529 | 1923787321 | True | True |
| 44881x44881 | 37 | 1213 | 1369 | 2014304161 | True | True |
| 45391x45391 | 19 | 2389 | 361 | 2060342881 | True | True |
| 46921x46921 | 7 | 6703 | 49 | 2201580241 | True | False |
The "Needs Tiles" column shows whether a heightmap of this size can be loaded only by breaking it in to tiles. With Unreal Engine 5.5.3 tiles become necessary when the vextex count * 2 (for 16bits per pixel PNG format) exceeds the limit of an int32 variable (2147483647).
The "Loadable" column shows whether a heightmap of this size can be loaded at all. With Unreal Engine 5.5.3, even when using tiles, heightmaps with a vertex count which exceeds the limit of an int32 variable (2147483647) cannot be loaded.
Making tiles
This python script will make and run a set of GDAL commands which will create separate PNG files for each tile.
import sys
import os
import subprocess
from concurrent.futures import ThreadPoolExecutor, as_completed
from tqdm import tqdm
import argparse

def run_command(cmd):
    process = subprocess.Popen(cmd, shell=True, stdout=subprocess.PIPE, stderr=subprocess.PIPE)
    stdout, stderr = process.communicate()
    return cmd, process.returncode, stdout.decode(), stderr.decode()

def make_tiles( input_file:str, tile_dir:str, tile_size:int, tile_count:int ):

    tile_prefix:str = "tile"
    min_height:float = 0
    max_height:float = 65535
    format:str = "-ot UInt16 -of PNG -scale " + str(min_height) +  " " + str(max_height) + " 0 65535"

    os.makedirs( tile_dir, exist_ok=True)

    commands: str = []

    for x in range(0, tile_count):
        for y in range(0, tile_count):
            cutting_frame = "-srcwin " + str(x*tile_size) + " " + str(y*tile_size) + " " + str(tile_size) + " " + str(tile_size)
            output_path = tile_dir + "/" + tile_prefix + "_x" + str(x) + "_y" + str(y) + ".png"
            full_command = "gdal_translate " + format + " " + cutting_frame + " " + input_file + " " + output_path
            commands.append( full_command )

    with ThreadPoolExecutor(max_workers=10) as executor:
        futures = {executor.submit(run_command, cmd): cmd for cmd in commands}

        with tqdm(total=len(futures), desc="Processing", unit="task") as pbar:
            for future in as_completed(futures):
                cmd, returncode, stdout, stderr = future.result()
                pbar.update(1)

parser = argparse.ArgumentParser()
parser.add_argument("--input", type=str, default="", help="input height map")
parser.add_argument("--tile-dir", type=str, default="", help="output tile directory")
parser.add_argument("--tile-size", type=int,  default="-1", help="tile size in pixels")
parser.add_argument("--tile-count", type=int, default="-1", help="number of tiles per side of outer square")

args = parser.parse_args()

if args.input == "" or args.tile_dir == "":
    parser.print_usage()
    sys.exit()

if args.tile_size < 0:
    parser.print_usage()
    sys.exit()

if args.tile_count < 0:
    parser.print_usage()
    sys.exit()

make_tiles( tile_dir=args.tile_dir, tile_count=args.tile_count, tile_size=args.tile_size, input_file=args.input )
20911 x 20911
If we choose a landscape size of 20911 x 20911, from the above table:
- each side is 11 tiles
- each tile is 1901 pixels
- there are 121 tiles.
The following command will create the tiles in a directory called ".\tiles20911":
python maketiles.py --input heightmap1m.png --tile-dir .\tiles20911 --tile-count 11 --tile-size 1901
To import the tile set, set the Heightmap File property on the Import from Tile tab to the first tile, i.e. tile_x0_y0.png
This imports into Unreal with:
- Section Size 255x255
- Sections per Component 1x1
- Number of Components 82x82
- Overall resolution 20911x20911
- Region count 36
41821 x 41821
The following command will create the tiles in a directory called ".\tiles41821":
python maketiles.py --input heightmap1m.png --tile-dir .\tiles41821 --tile-count 13 --tile-size 3217
This imports into Unreal with:
- Section Size 255x255
- Sections per Component 1x1
- Number of Components 164x164
- Overall resolution 41821x41821
- Total components 26896
- Region count 36
It takes significantly longer to import than the 20911 x 20911 resolution.
If we save the map with the name "41821" the created actors are in this directory
..\Content_ExternalActors_\Maps\41821
The are 4.07 GB
Limits
The largest file (i.e. the highest pixel resolution) Unreal can Import
is 43351 x 43351. Internally (in FLandscapeTiledImage::ReadRegion) Unreal
uses int32 values to index into heightmap data - the max value
for an int32 is 2,147,483,647, so the resolution needs to be less than sqrt(2,147,483,647) which is 46340.
Bugs
The FLandscapeImageFileCache caches image data such as resolutions. If you
set the Heightmap File property of the landscape dialog to a heightmap file
it will read the file resolution and save it in the cache. If you subsequently
recreate the file at a different resolution and reuse the import file dialog
it will populate the import dialog with old data from the cache,
not what is in the recreated file.
To stop this happening change to some random PNG file and then change back to the file you want to use, this clears the cache.
Higher resolutions
Do we get a better landscape if we take the original DEM data sampled at degree resolution, convert it to meters, then convert it to a higher resolution?
Specifically, if we compare a heightmap where each pixel is ~34m, to a heightmap where each pixel is 5m, is there a noticeable difference?
Logically we cannot add detail, but depending on how we do the sampling we will both:
- add new points between the original DEM points
- adjust the position of the original DEM points
If we start with the demdata.tif which has this elevation data:
Computed Min/Max=3595.000,6180.000
we can convert it to heightmap measured in meters:
gdalwarp -t_srs EPSG:3857 -dstnodata -9999 -ot Float32 demdata.tif demdata_meters.tif -wo NUM_THREADS=ALL_CPUS -overwrite
gdal_translate -scale 3595 6180 0 65535 -ot UInt16 -of PNG demdata_meters.tif heightmap_meters.png
# trim to a 511 x 511 pixel size
gdal_translate -srcwin 0 0 511 511 -ot UInt16 -of PNG heightmap_meters.png heightmap_meters511.png
The Pixel Size in heightmap_meters511.png is (33.785552205353980,-33.785552205353980)
Therefore the Scale property of the Unreal landscape import screen should be
3378.5522, 3378.5522, 6180.000 * 100 / 512 = 1202.33
Then we make a heightmap which is a 5m resolution by sampling the heightmap_meters.png file:
gdalwarp -tr 5 5 -ot Uint16 -r cubic heightmap_meters.png heightmap_5meters.png -wo NUM_THREADS=ALL_CPUS -overwrite
The heightmap_meters511.png is 511 pixels by 33.7855m = 17,264.39m so truncate the 5m file to 3,453 x 3,453 pixels:
gdal_translate -srcwin 0 0 3453 3453 -ot UInt16 -of PNG heightmap_5meters.png heightmap_5meters511.png
The Pixel Size in heightmap_5meters511.png is = (5.000000000000000,-5.000000000000000)
Therefore the Scale property of the Unreal landscape import screen should be
500, 500, 1202.33
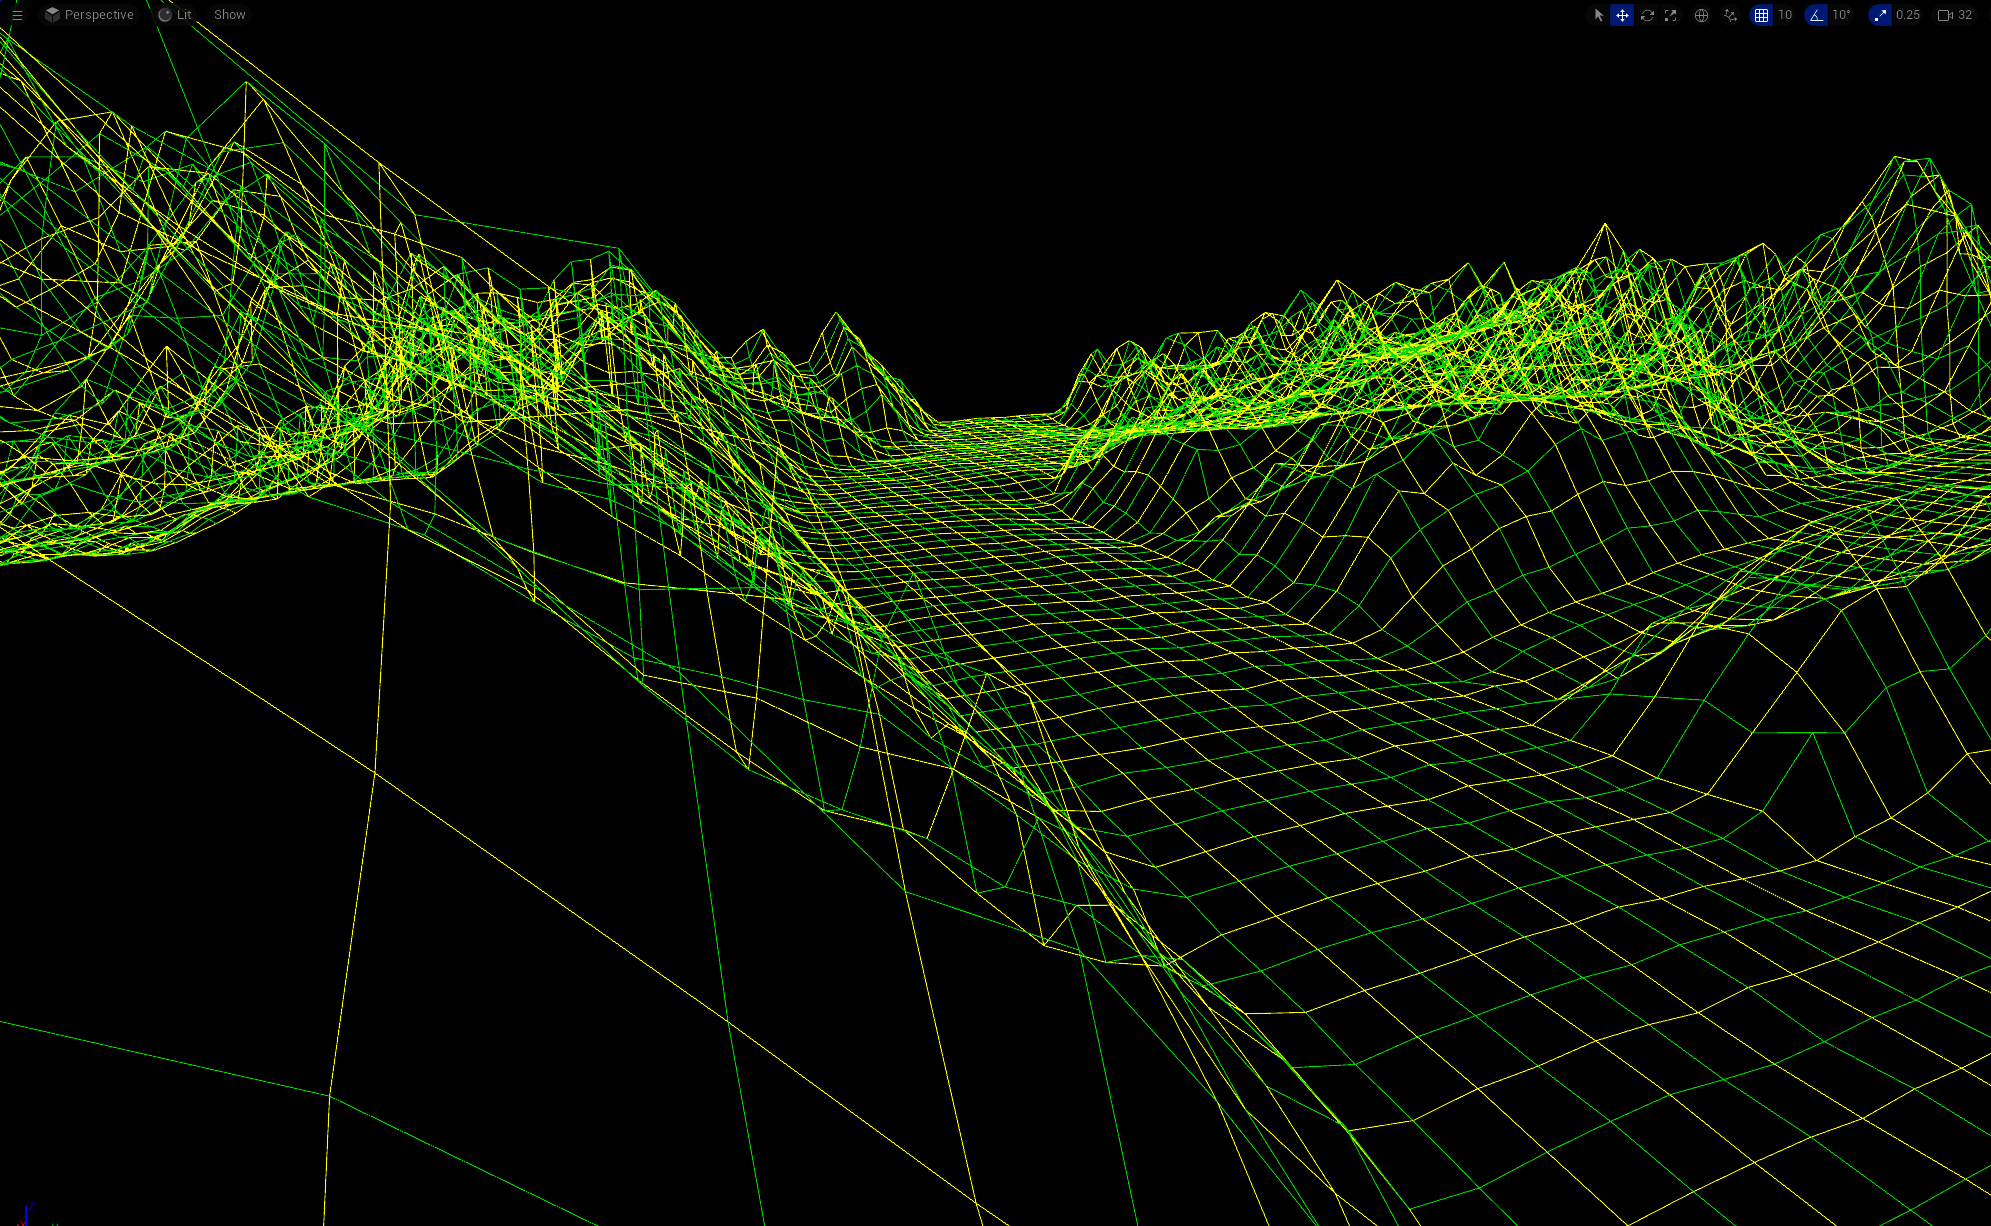
Comparing the lit wireframe views of the two landscapes, firstly the 33.78 meters per pixel:
And the 5m per pixel:
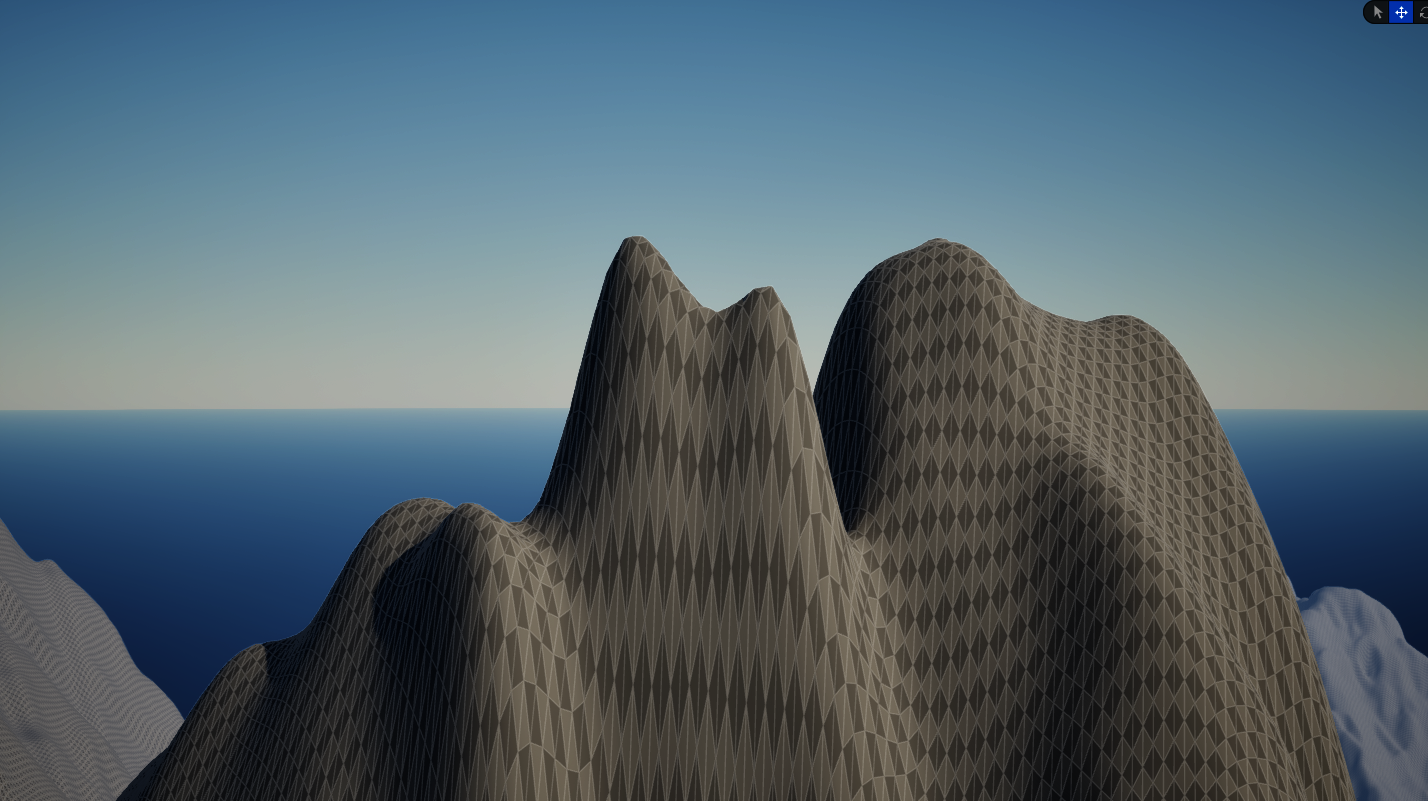
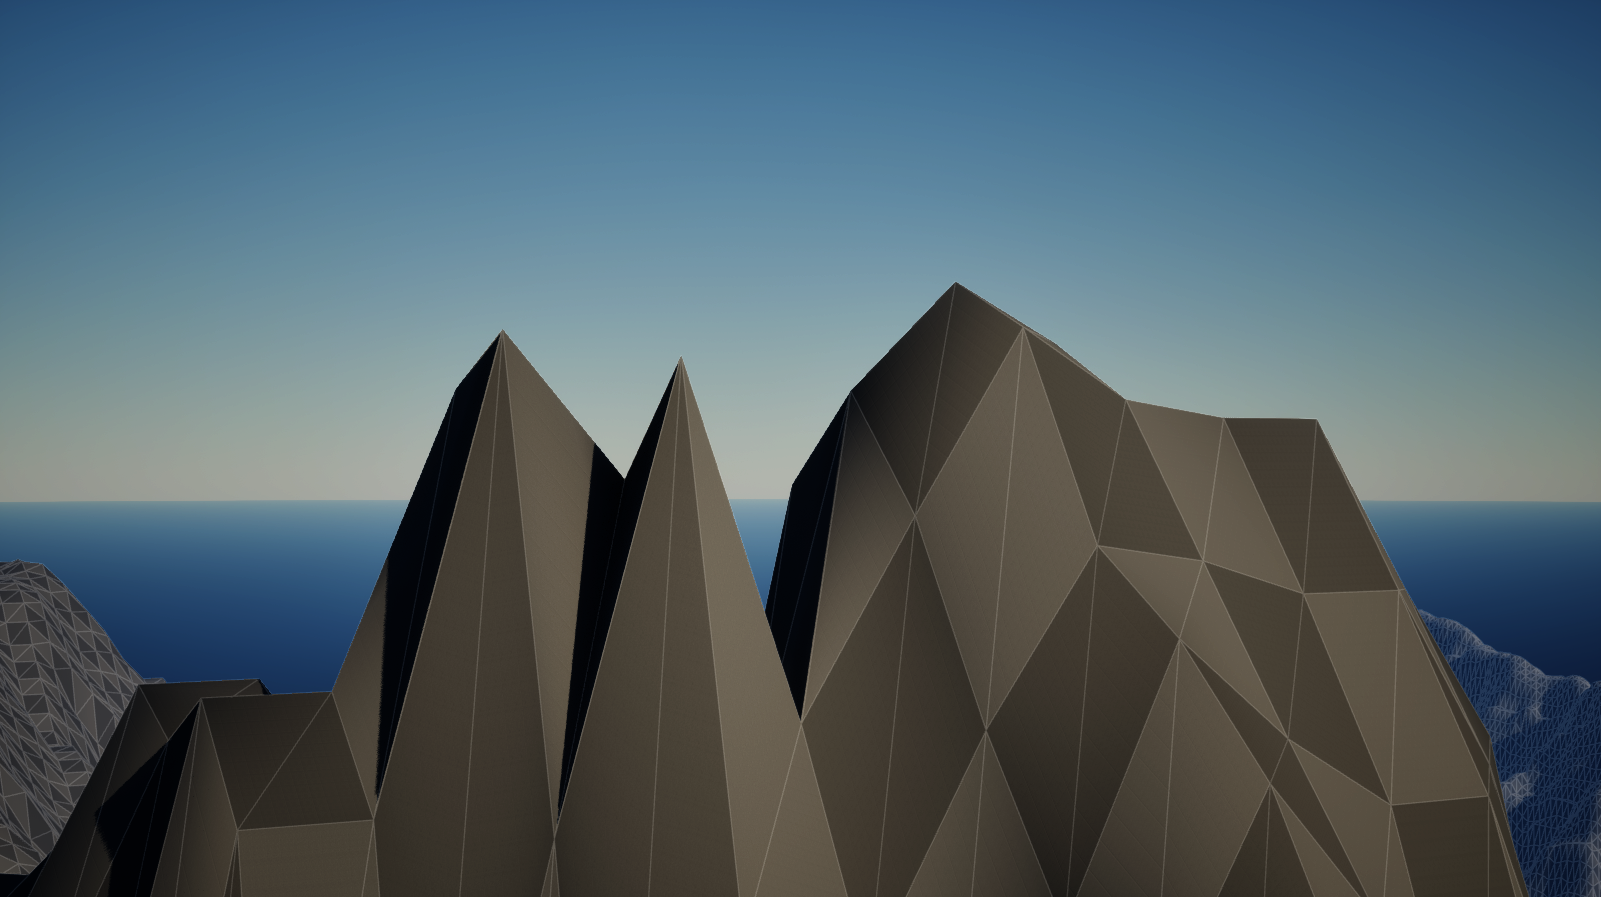
This shows that resampling the heightmap to a higher resolution both smooths the landscape and adds more detail.
Another advantage of higher resolutions is that the triangles are smaller so textures used in materials will not be stretched so much.