Experiments With Chaos Physics - Using Python
The page PhysicsUsingBlueprints describes the creation of a simple physics example implementing a trebuchet using blueprints.
This page describes implementing the same thing using Python.
Introduction
The Unreal Editor ships with python 3.9.7 embedded in it. You do not need to install any other distribution of python, although it could be useful if you are running an external editor like pycharm.
The Unreal Engine 5.1 python documentation is found at https://docs.unrealengine.com/5.1/en-US/PythonAPI/
Basics
To use python in Unreal Editor first make sure these plugins are enabled:
- "Python Editor Script Plugin"
- "Editor Scripting Utilities"
We will be editing python commands in a file external to Unreal and executing it from the command line at the bottom of the Output Log window:
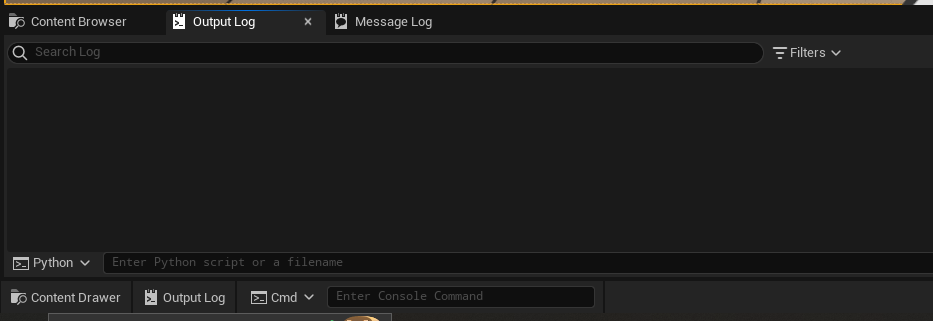
To tell Unreal which directory your python files will be loaded from, use the Edit | Project Settings... menu option, then type "python" in the filter text box. You should see a window like this one:
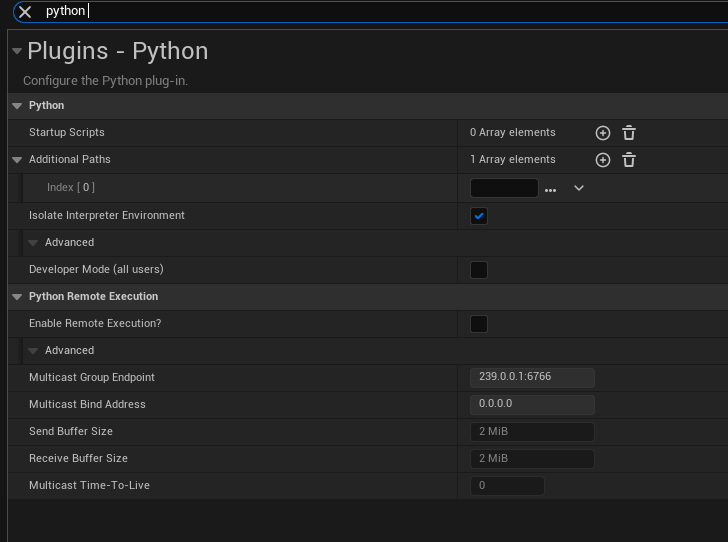
Click the "+" next to the Additional Paths and add the location of your files. You may need to restart the editor after this.
Example File
To test the basic loading of python scripts do the following:
- make a directory called "python" underneath your projects content directory
- add the python directory to the Additional Paths array as described above
- download the file make_world.py and save it into your content/python directory.
To load the make_world.py script in Unreal, use the command line at the bottom of the Output Log window as shown here:
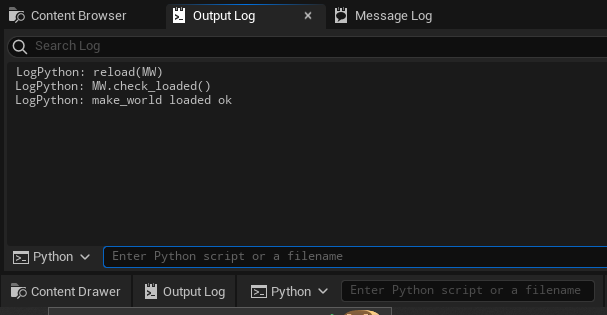
Make sure the drop-down list on the left of the command line says "Python", and enter this command:
import make_world as MW
In order to change the file externally and reload it, we need to run this command once:
from importlib import reload
and then each time we change the file we can type
reload(MW)
to reload it.
Entering multiple lines
To test multiple lines of code you can type them in the command line by separating them with shift-enter, for example you can type
import unreal
print(unreal.LayersSubsystem().get_world())
as one command. To repeatedly reload the python file from disk and execute it you can enter this as one command (with shift-enter between the lines):
reload(MW)
MW.run()
The example python file contains multiple functions, so you can call the ones you want using a multi-line scripts like so:

Checking it works
At the top of the example python file are these lines:
import unreal

def check_loaded():
    print("make_world loaded ok")
so to check everything is working we can type: (use shift-enter to insert a line break)
reload(MW)
MW.check_loaded()
and we should see this in the Output Log:

Creating a New Level
This is the code to create a new level, in a function which takes the level path.
def new_level(name):
    ELL = unreal.EditorLevelLibrary()
    ELL.new_level(name)
It could be called from the Unreal command line like this:
MW.new_level("/Game/Levels/NewLevel01")
This will generate output similar to this in the Output Log window:
Cmd: OBJ SAVEPACKAGE PACKAGE="/Game/Levels/NewLevel" FILE="../../../../../../tmp/Content/Levels/NewLevel.umap" SILENT=true AUTOSAVING=false KEEPDIRTY=false LogUObjectHash: Compacting FUObjectHashTables data took 0.32ms
LogSavePackage: Moving output files for package: /Game/Levels/NewLevel
LogSavePackage: Moving '../../../../../../tmp/MyProject9/Saved/NewLevelF447BBBC4C547A0F0EA7F39017B7A537.tmp' to '../../../../../../tmp/MyProject9/Content/Levels/NewLevel.umap'
LogFileHelpers: Saving map 'NewLevel' took 0.072
AssetCheck: New page: Asset Save: NewLevel
LogContentValidation: Display: Validating World /Game/Levels/NewLevel.NewLevel
If the level already exists it will generate an error like this:
LevelEditorSubsystem: Error: NewLevel. Failed to validate the destination. An asset already exists at this location.
Making Meshes from FBX files
This is the code used to import a set of .fbx files into Static Mesh objects:
def build_options() -> unreal.FbxImportUI:
    options = unreal.FbxImportUI()
    options.set_editor_property( name='import_mesh', value=True)
    options.set_editor_property( name='import_textures', value=False)
    options.set_editor_property( name='import_materials', value=False)
    options.set_editor_property( name='import_as_skeletal', value=False)
    options.static_mesh_import_data.set_editor_property( name='import_uniform_scale', value=1.0)
    options.static_mesh_import_data.set_editor_property( name='combine_meshes', value=True)
    options.static_mesh_import_data.set_editor_property( name='auto_generate_collision', value=True )
    return options


def build_import_task(mesh_name: str,
                      filename: Path,
                      destination_path: str,
                      options: unreal.FbxImportUI ) -> unreal.AssetImportTask:
    task = unreal.AssetImportTask()
    task.set_editor_property( name='automated', value=True)
    task.set_editor_property( name='destination_name', value=mesh_name)
    task.set_editor_property( name='destination_path', value=destination_path)
    task.set_editor_property( name='filename', value=str(filename) )
    task.set_editor_property( name='replace_existing', value=True)
    task.set_editor_property( name='replace_existing_settings', value=True)
    task.set_editor_property( name='save', value=True)
    task.set_editor_property( name='options', value=options)
    return task


def import_static_meshes():
    mesh_data: dict[str, Path] = {
        "SM_Arm": Path("C:\\work\\TrebBlender\\Arm.0040_6.fbx"),
        "SM_Ramp": Path("C:\\work\\TrebBlender\\Ramp.fbx"),
        "SM_Weight": Path("C:\\work\\TrebBlender\\Weight.004_2.fbx"),
        "SM_Base": Path("C:\\work\\TrebBlender\\Base.004_3.fbx")
    }

    options: unreal.FbxImportUI = build_options()

    tasks: list[Unreal.task] = [
        build_import_task(mesh_name=mesh_name, filename=path, destination_path="/Game/Meshes", options=options)
        for mesh_name, path in mesh_data.items()]

    unreal.AssetToolsHelpers.get_asset_tools().import_asset_tasks(tasks)

    # make the base use complex mesh for collision, so it does not collide with the weight
    mesh: unreal.StaticMesh = load_mesh(path="/Game/Meshes/SM_Base")
    body_setup: unreal.BodySetup = mesh.get_editor_property("body_setup")
    body_setup.set_editor_property(name="collision_trace_flag",
                                   value=unreal.CollisionTraceFlag.CTF_USE_COMPLEX_AS_SIMPLE )
Basically what is does is create a unreal.AssetImportTask() for each fbx file
and then execute it to create a StaticMesh in the "/Game/Meshes" directory.
We treat the SM_Base mesh differently. We want to set the "Collision Complexity" property to "Use Complex Collision as Simple". This involves getting the "body_setup" property from the mesh and updating it. It is not necessary to set the "body_setup" property back on the mesh - we have reference to the body_setup property rather than a copy of it.
mesh: unreal.StaticMesh = load_mesh(path="/Game/Meshes/SM_Base")
body_setup: unreal.BodySetup = mesh.get_editor_property("body_setup")
body_setup.set_editor_property(name="collision_trace_flag",
                               value=unreal.CollisionTraceFlag.CTF_USE_COMPLEX_AS_SIMPLE )
Making a Blueprint
This section shows how to make a new blueprint class, how to add components to it, and to set the properties on those components.
The code for making a blueprint is:
def make_blueprint(package_path: str, asset_name: str):

    factory = unreal.BlueprintFactory()
    factory.set_editor_property(name="parent_class", value=unreal.Actor)

    asset_tools: unreal.AssetTools = unreal.AssetToolsHelpers.get_asset_tools()

    asset: Object = asset_tools.create_asset(asset_name=asset_name,
                                             package_path=package_path,
                                             asset_class=None,
                                             factory=factory)
    if not isinstance(asset, unreal.Blueprint):
        raise Exception("Failed to create blueprint asset")
    blueprint: unreal.Blueprint = asset # noqa
This is called by passing in the location where the blueprint will be created and its name, like so:
package_path = "/Game/Blueprints"
asset_name = "BP_Trebuchet20"
MW.make_blueprint( package_path, asset_name )
About Components
In the Unreal forums there is a snippet showing how to add components to a blueprint using blueprint script. The code below follows a similar approach except it uses python instead of blueprints.
First we get the subsystem which is used to create components (aka subobjects):
subsystem: unreal.SubobjectDataSubsystem
     = unreal.get_engine_subsystem(unreal.SubobjectDataSubsystem)
Handles
The Unreal python API distinguishes between an object and a handle.
Conceptually, a python variable
(for example of type unreal.Object) holds a direct reference to an object.
A handle (of type unreal.SubobjectDataHandle) holds a unique identifier for an object, not the object itself. We need to bear in mind that we can
have a handle which is invalid. It might refer to an object which no longer exists, for example it was deleted after we obtained the handle, or perhaps the handle
was created without associating an object with it.
We have put the code for creating a component in a separate function:
def add_subobject(subsystem: unreal.SubobjectDataSubsystem,
                  blueprint: unreal.Blueprint,
                  new_class,
                  name: str ) -> ( unreal.SubobjectDataHandle, unreal.Object ):

    root_data_handle: unreal.SubobjectDataHandle =
         subsystem.k2_gather_subobject_data_for_blueprint(context=blueprint)[0]

    sub_handle, fail_reason = subsystem.add_new_subobject(
        params=unreal.AddNewSubobjectParams(
            parent_handle=root_data_handle,
            new_class=new_class,
            blueprint_context=blueprint))

    if not fail_reason.is_empty():
        raise Exception("ERROR from sub_object_subsystem.add_new_subobject: {fail_reason}")

    subsystem.rename_subobject(handle=sub_handle, new_name=unreal.Text(name))
    subsystem.attach_subobject(owner_handle=root_data_handle, child_to_add_handle=sub_handle)

    BFL = unreal.SubobjectDataBlueprintFunctionLibrary
    obj: Object = BFL.get_object(BFL.get_data(sub_handle))
    return sub_handle, obj
We pass this function:
- the subsystem which is used to create components
- the blueprint we want the component added to
- the class of the component we want created, such as
unreal.StaticMeshComponent - the name of the new component
The function returns both the handle to the object and the new object itself.
The function calls subsystem.add_new_subobject() to create the component,
and then we use these lines to get the object from the handle:
BFL = unreal.SubobjectDataBlueprintFunctionLibrary
obj = BFL.get_object(BFL.get_data(sub_handle))
We return both the handle and the object because we need the handle to position the new component as a child of other components, and we need to object to set properties on it.
Creating Components
The code for creating different types of subcomponents and setting their properties is below.
For a Static Mesh Component we do this:
sub_handle, weight = add_subobject(subsystem=subsystem,
                                   blueprint=blueprint,
                                   new_class=unreal.StaticMeshComponent,
                                   name="Weight")
assert isinstance(weight, unreal.StaticMeshComponent)
mesh: unreal.StaticMesh = load_mesh(path="/Game/Meshes/SM_Weight")
weight.set_static_mesh(new_mesh=mesh)
weight.set_editor_property(name="mobility", value=unreal.ComponentMobility.MOVABLE)
weight.set_editor_property(name="relative_location", value=unreal.Vector(10.0, -165.0, 640.0))
weight.set_simulate_physics(simulate=True)
weight.set_enable_gravity(gravity_enabled=True)
weight.set_mass_override_in_kg(unreal.Name("NAME_None"), 4506)
weight.set_collision_profile_name(collision_profile_name=PhysicsActor)
subsystem.attach_subobject( base_handle, sub_handle )
For a Physics Constraint Component we do this:
# ArmBaseConstraint
sub_handle, arm_base = add_subobject(subsystem=subsystem,
                                     blueprint=blueprint,
                                     new_class=unreal.PhysicsConstraintComponent,
                                     name="ArmBaseConstraint")
assert isinstance(arm_base, unreal.PhysicsConstraintComponent)
arm_base.set_editor_property(name="relative_location",
    value=unreal.Vector(10.000000, 0.000000, 740.000000))
arm_base.set_editor_property(name="component_name1", value=ccBase)
arm_base.set_editor_property(name="component_name2", value=ccArm)
arm_base.set_linear_x_limit(unreal.LinearConstraintMotion.LCM_LOCKED, 0)
arm_base.set_linear_y_limit(unreal.LinearConstraintMotion.LCM_LOCKED, 0)
arm_base.set_linear_z_limit(unreal.LinearConstraintMotion.LCM_LOCKED, 0)
arm_base.set_angular_swing1_limit(unreal.AngularConstraintMotion.ACM_LOCKED, 0)
arm_base.set_angular_swing2_limit(unreal.AngularConstraintMotion.ACM_LOCKED, 0)
arm_base.set_angular_twist_limit(unreal.AngularConstraintMotion.ACM_FREE, 0)
arm_base.set_disable_collision(True)
subsystem.attach_subobject( base_handle, sub_handle )
Component Names
Physics Constraint Components need to know the names of the components they are connected to.
In c++ this is done by calling SetConstrainedComponents() and passing in the two components like this:
Base = CreateDefaultSubobject<UStaticMeshComponent>(TEXT("Base"));
Arm = CreateDefaultSubobject<UStaticMeshComponent>(TEXT("Arm"));
ArmBaseConstraint =
   CreateDefaultSubobject< UPhysicsConstraintComponent >(TEXT("ArmBaseConstraint"));
ArmBaseConstraint->SetConstrainedComponents( Base, TEXT(""), Arm, TEXT("") );
From the python documentation it looks as though the same approach would work, namely:
sub_handle, base = add_subobject(subsystem=subsystem,
                                   blueprint=blueprint,
                                   new_class=unreal.StaticMeshComponent,
                                   name="Base")
sub_handle, arm = add_subobject(subsystem=subsystem,
                                   blueprint=blueprint,
                                   new_class=unreal.StaticMeshComponent,
                                   name="Arm")
sub_handle, constraint = add_subobject(subsystem=subsystem,
                                     blueprint=blueprint,
                                     new_class=unreal.PhysicsConstraintComponent,
                                     name="ArmBaseConstraint")
constraint.set_constrained_components( base, "", arm, "" )
But this does not work. If we use the c++ code, the constraint ends up referencing a component named "Base", which is what we want, but using the python code it ends up a component name of "Base_GEN_VARIABLE" for some reason.
So we have to use the set_editor_property() call to specify each constrained component name
and that takes an object of type unreal.ConstrainComponentPropName, so we have to
make those objects like so:
def make_component_name(name: str) -> unreal.ConstrainComponentPropName:
    cc = unreal.ConstrainComponentPropName()
    cc.set_editor_property(name="component_name", value=name)
    return cc

ccBase = make_component_name(name="Base")
ccArm = make_component_name(name="Arm")

constraint.set_editor_property(name="component_name1", value=ccBase)
constraint.set_editor_property(name="component_name2", value=ccArm)
Spawning an Actor
To create an instance of the new blueprint in the world we do this:
def spawn(package_path: str, asset_name: str):
    # spawn actor on map
    EAL = unreal.EditorAssetLibrary
    ELL = unreal.EditorLevelLibrary
    blueprint_class = EAL.load_blueprint_class( asset_path=package_path + "/" + asset_name )
    assert isinstance(blueprint_class, unreal.BlueprintGeneratedClass )
    location = unreal.Vector(0, 0, 0)
    rotation = (location - location).rotator()
    ELL.spawn_actor_from_class(actor_class=blueprint_class, location=location, rotation=rotation)
To spawn a PlayerStart object we do this:
def spawn_player_start():
    # spawn actor on map
    ELL = unreal.EditorLevelLibrary
    location = unreal.Vector(2000, 0, 500)
    rotation = unreal.Rotator(0, 0, 180)
    ELL.spawn_actor_from_class( actor_class=unreal.PlayerStart,
        location=location, rotation=rotation)
Adding Lighting
This code constructs some lighting objects so we can see the scene and check it works:
def create_lights():
    ELL = unreal.EditorLevelLibrary
    location = unreal.Vector(2000, 0, 500)
    rotation = unreal.Rotator(0, 0, 180)

    skylight: unreal.Actor = ELL.spawn_actor_from_class( actor_class=unreal.SkyLight, location=location, rotation=rotation)
    atmos_light: unreal.Actor = ELL.spawn_actor_from_class( actor_class=unreal.DirectionalLight, location=location, rotation=rotation)
    atmos: unreal.Actor = ELL.spawn_actor_from_class( actor_class=unreal.SkyAtmosphere, location=location, rotation=rotation)
    cloud: unreal.Actor = ELL.spawn_actor_from_class( actor_class=unreal.VolumetricCloud, location=location, rotation=rotation)
    fog: unreal.Actor = ELL.spawn_actor_from_class( actor_class=unreal.ExponentialHeightFog, location=location, rotation=rotation)

    if isinstance(atmos_light, unreal.DirectionalLight):
        dlc: unreal.DirectionalLightComponent = atmos_light.get_editor_property("directional_light_component")
        dlc.set_intensity(new_intensity=400)
Finally
The python script we have been looking at is divided up in functions both to simplify it and so the functions can be called separately while testing. The script also contains a single function show below which creates the map, imports the meshes, creates a new blueprint and sets up the scene so all we have to do is press play:
def create_everything():
    level_name = "/Game/Levels/NewLevel24"
    package_path = "/Game/Blueprints"
    asset_name = "BP_Trebuchet24"

    new_level(name=level_name)
    set_current_level(name=level_name)
    import_static_meshes()
    make_blueprint( package_path=package_path, asset_name=asset_name )
    spawn( package_path=package_path, asset_name=asset_name )
    spawn_player_start()
    create_lights()
If we run this script like so:
The we can see the new level with the trebuchet actor and the lighting:
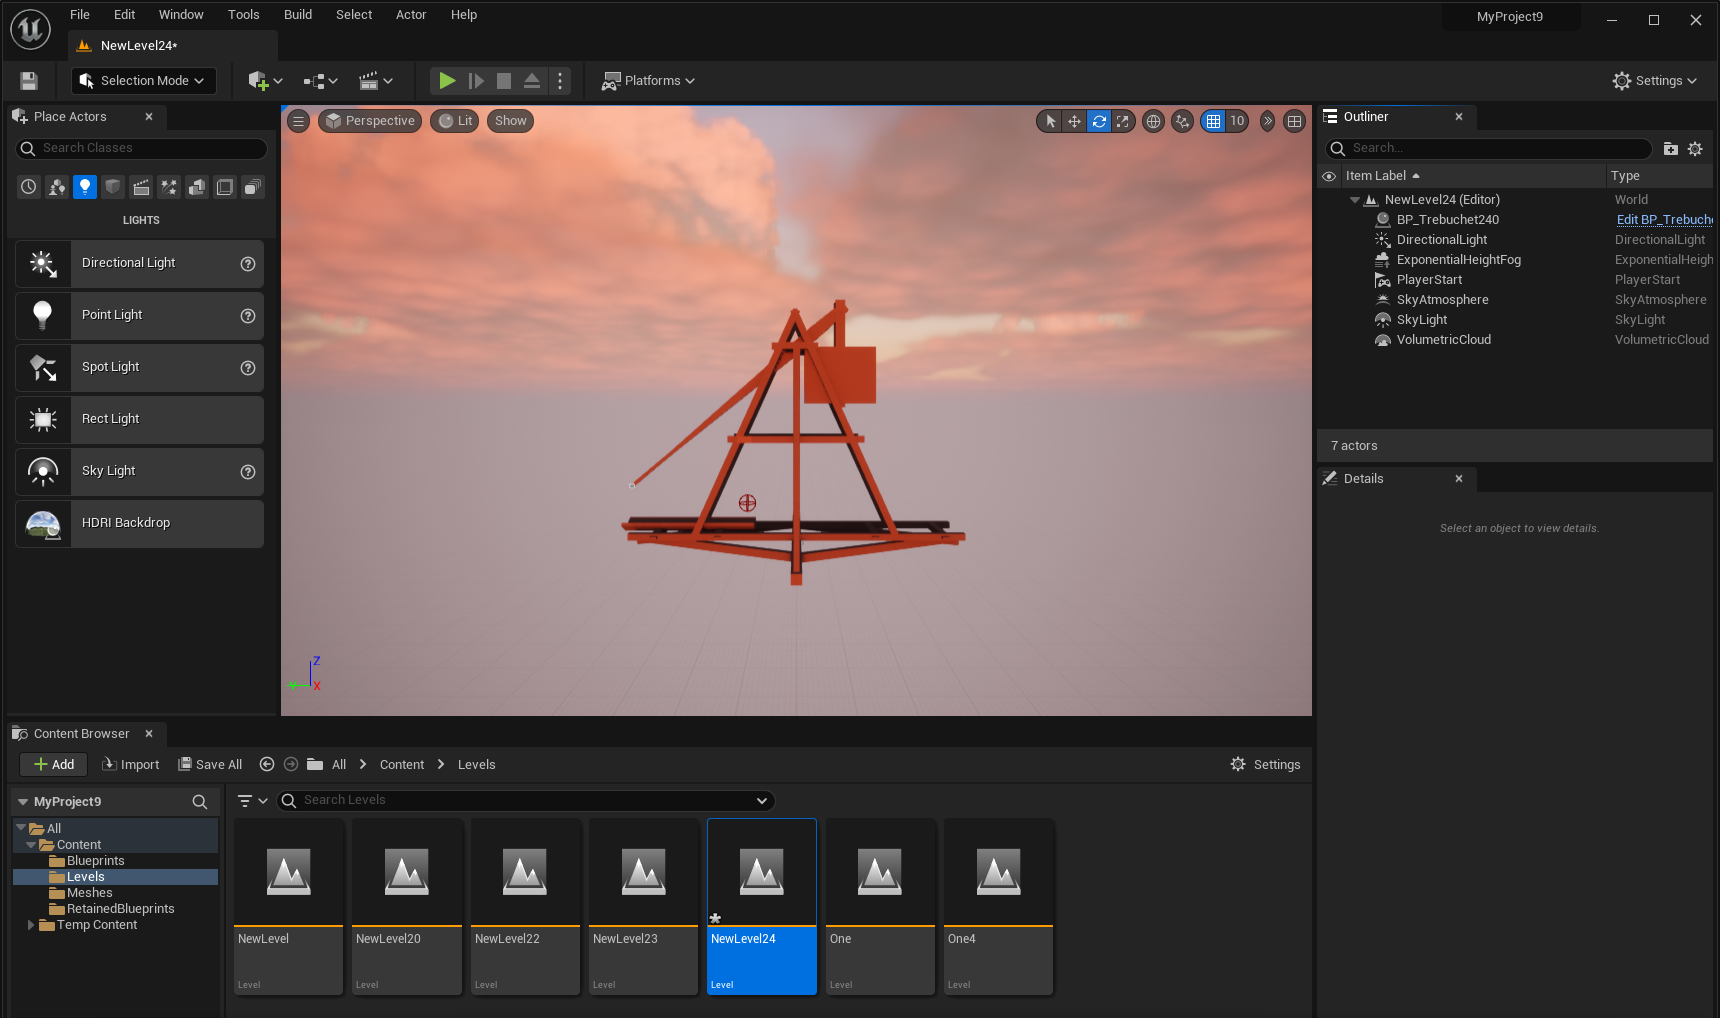
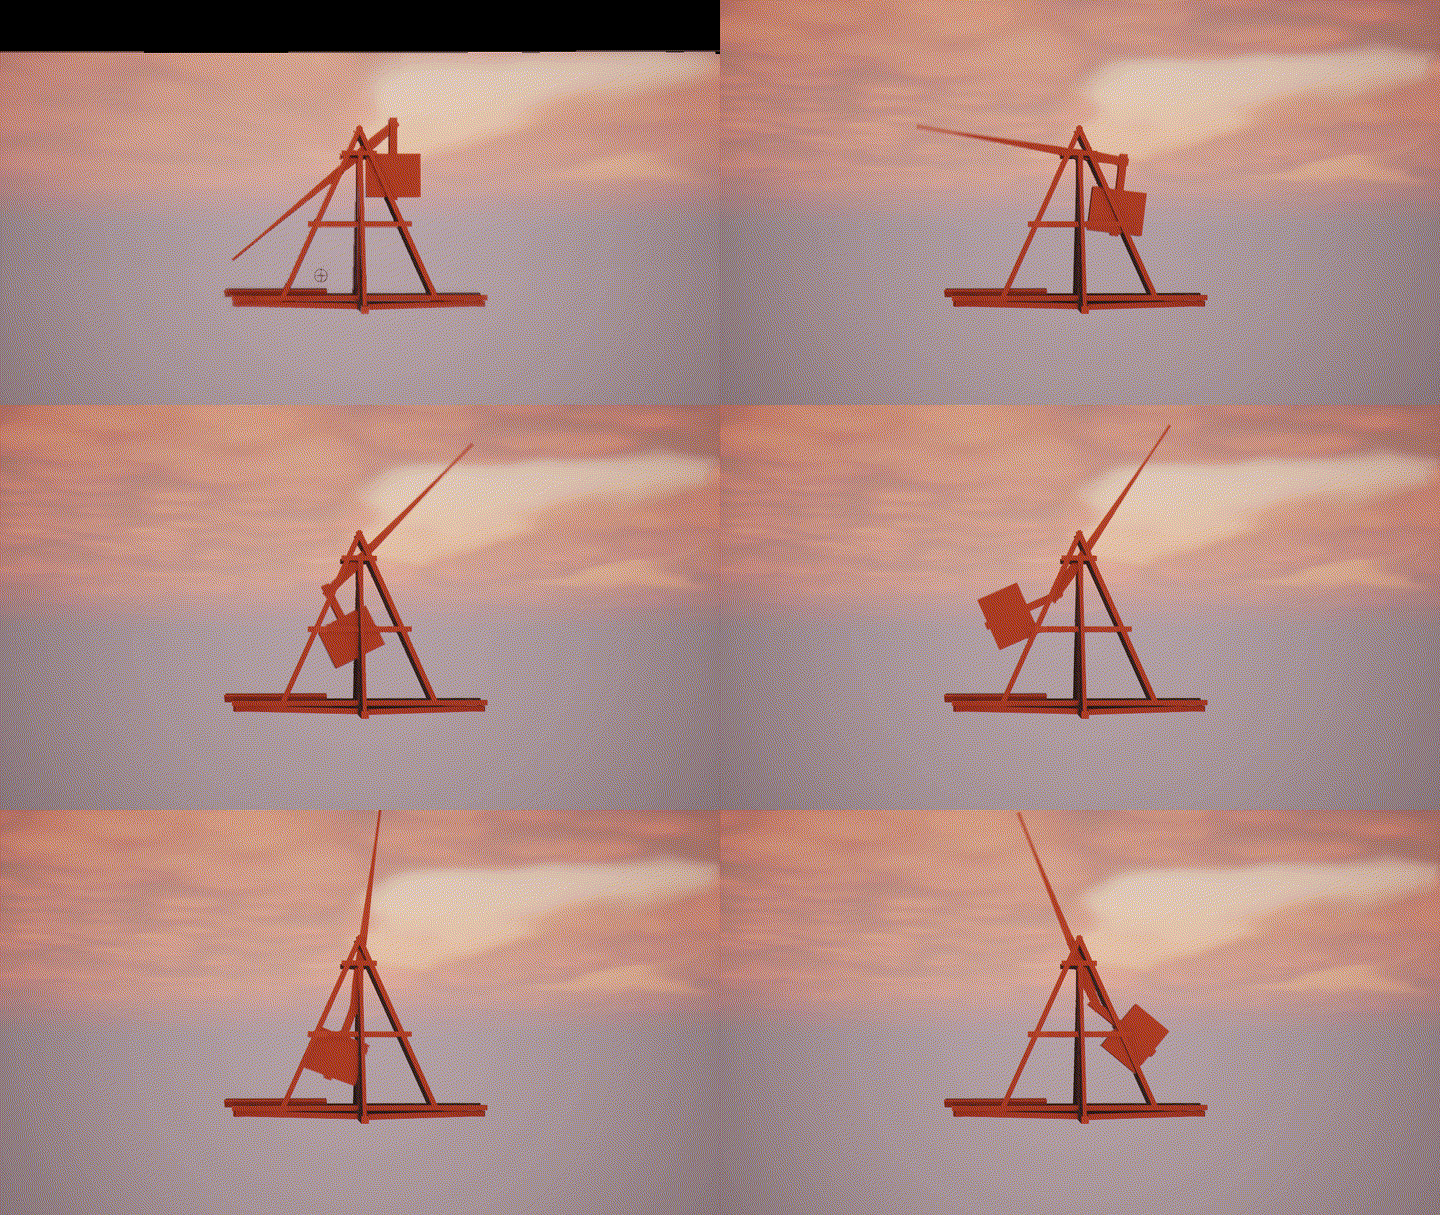
And if we press play we can see the blueprint working:
Feedback
Please leave any feedback about this article here