Using Visual Studio Team Services with Unreal Engine
Visual Studio Team Services (VSTS) provides cloud-based git repositories hosted on Microsoft's Azure cloud system. This can be used to store git LFS repositories with unlimited private repositories accessible for free for up to five users.
Setup Steps
Accounts
From this page chose "Try Azure for Free" to sign up for an Azure account. In additon to creating the Azure account it will create an account with Microsoft as well.
Eventually this process leads to an email "Welcome to your new Azure subscription" with a link to the Azure portal.
DevOps Organization
You need to create an organization with a unique name in order to be able to create git repositories.
Open the Azure portal and in the top search bar type "azure devops" like so:
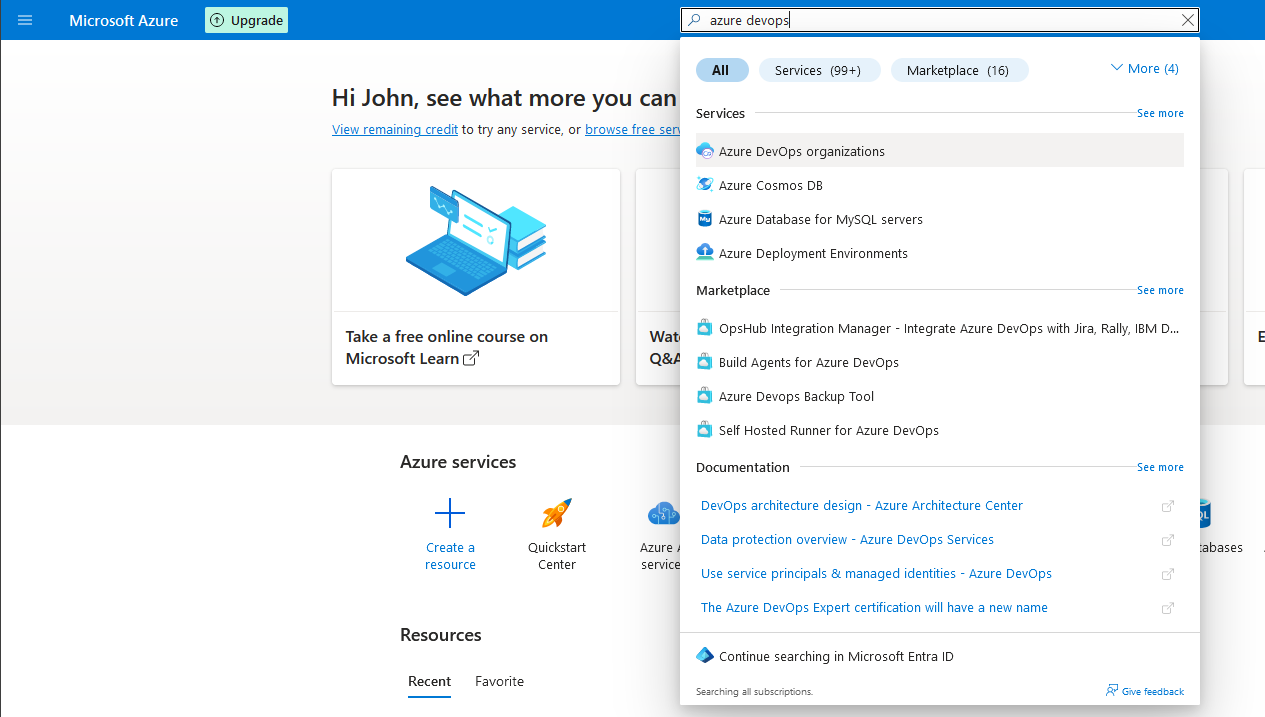
Chose the "Azure DevOps organizations" option, on the next screen chose "My Azure DevOps Organizations". You might be asked to log in again at this point.
Eventually you will see this screen:

Select the "Create New Organization" button and enter the reqiured details:

Once the organization has been create you will be prompted to create a new project. By default only private projects can be created - to change this use ths "organization policies" link on this page.
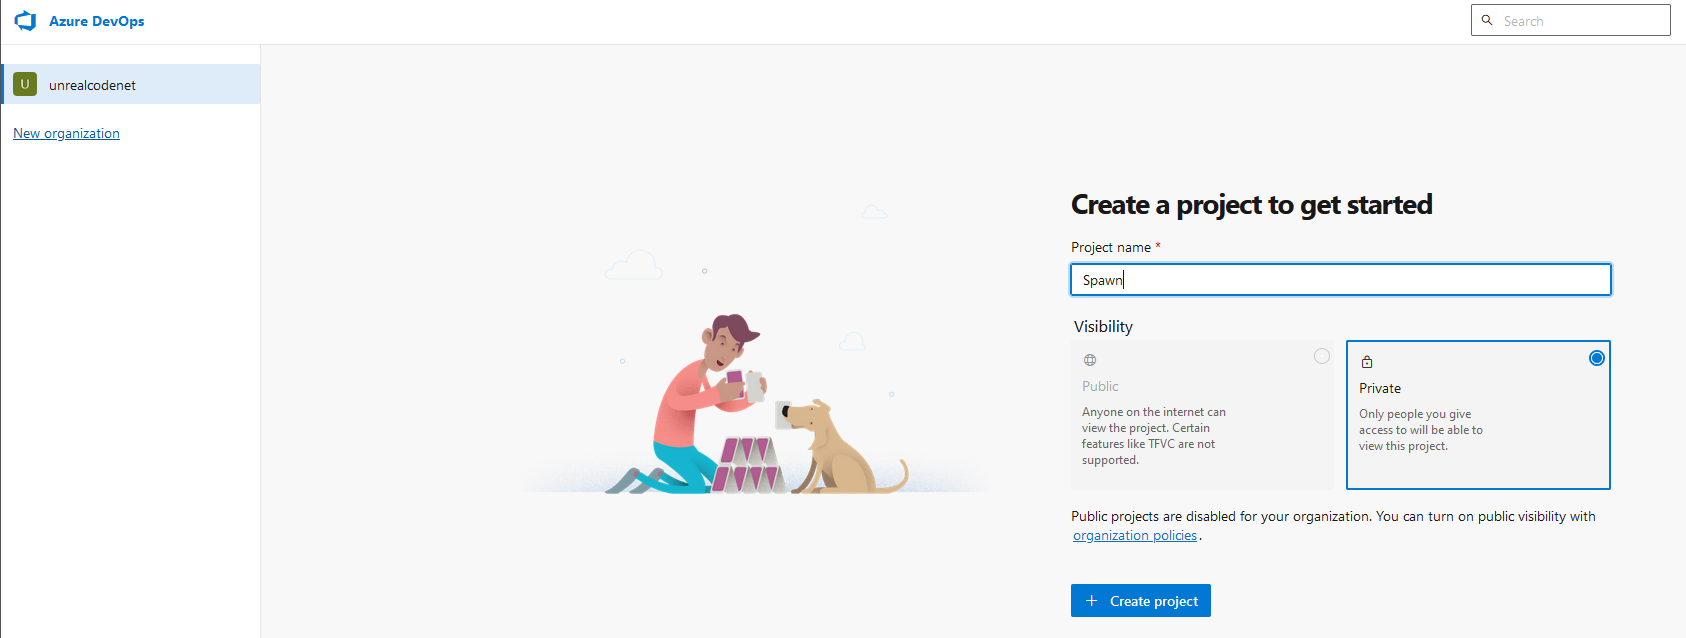
Enter the project name and press the "Create Project" button.
Once the project has been created, on the left hand side of the screen select "Repos" to create a new git repository.
Normal Usage
Once the logins and organization has been setup you can do directly to https://dev.azure.com/ORGNAME/
About Git LFS
Git LFS stores large binary files (which is most Unreal assets) differently to normal source code files. It also provides the ability to checkout and lock files to prevent multiple people changing them at the same time.
With a normal source file git stores every version of that file in your local copy of the repository. This enables you to look at the history of file, examine changes, and compare versions of the file without accessing the git server. Large binary files (i.e. most Unreal Engine assets) cannot be compared with other versions of the same file so there is no point in storing every copy of the file in your local repository. With Git LFS you only the latest version of a large file and then store a small pointer file for each previous version. The pointer file references the real larger file which remains on the server. The large file is only copied to your local repository if you ever checkout that version of the file. This results in:
- much faster cloning of repositories because all of the versions of large files are not retriveved from the server - only the latest one is retrieved.
- much smaller local repositories, because each version of a large file is represented by a small pointer file instead of the actual large file.
Pushing an existing project
This describes how to add a set of existing files to a newly created git repo on Azure. In this example the repository on the dev.azure.com is called "Spawn".
In the directory which contains the existing repository, enter this command to initialize git:
git init
git lfs install
You should see
Initialized empty Git repository in D:/work/Spawn/.git/
Configure git with the new address of the new Azure repo:
git remote add origin https://unrealcodenet@dev.azure.com/unrealcodenet/Spawn/_git/Spawn
Add a .gitignore file, an example can be found here
Add some files:
git add Source
git commit -m "added source" .
Push the local git repo to the server:
git push -u origin --all
This will popup the Microsoft login screen, once you enter the username and password it might work. This uses the Git Credential Manager to handle security and caching of passwords so you don't need to enter them every time you push to the git server.
It might crash with this message:
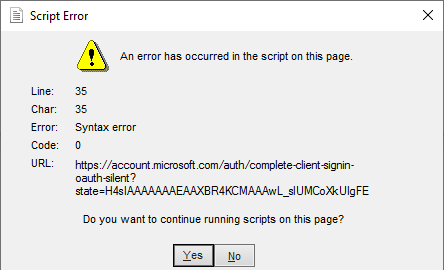
Retry the push command until it succeeds.
Once it has succeeded credentials are cached locally and you will not be asked again.
Configuring Git LFS
To tell Git LFS which files should be tracked as large files add a .gitattrributes file like this one:
*.uasset filter=lfs diff=lfs merge=lfs -text lockable
*.umap filter=lfs diff=lfs merge=lfs -text lockable
Don't forget to add the .gitattributes file to the reposiory.
An example of a more complex .gitattributes file which deals with more file types can be found here
Once you have configured git lfs, if you add large files you will see corresponding lfs messages when you commit and push:
git add Content
git commit -m "added large files"
git push
Uploading LFS objects: 100% (451/451), 1.1 GB | 9.3 MB/s, done.
Enumerating objects: 549, done.
Counting objects: 100% (549/549), done.
Delta compression using up to 32 threads
Compressing objects: 100% (528/528), done.
Writing objects: 100% (548/548), 73.81 KiB | 1.48 MiB/s, done.
Total 548 (delta 0), reused 0 (delta 0), pack-reused 0 (from 0)
remote: Analyzing objects... (548/548) (12 ms)
remote: Validating commits... (1/1) done (1 ms)
remote: Storing packfile... done (56 ms)
remote: Storing index... done (56 ms)
To https://dev.azure.com/unrealcodenet/Spawn/_git/Spawn
57bdb45..701ed07 dev -> dev
Enabling locking in Git
This command will enable locking for large files:
git config lfs.https://unrealcodenet@dev.azure.com/unrealcodenet/Spawn/_git/Spawn.git/info/lfs.locksverify true
Once you have done this you can test the locking from the command line by locking a file like this:
git lfs lock Content\StarterContent\Props\MaterialSphere.uasset
Locked Content/StarterContent/Props/MaterialSphere.uasset
Then use this command to confirm the lock exists:
git lfs locks
Content/StarterContent/Props/MaterialSphere.uasset john.farrow ID:1
Then use this command to unlock the file:
git lfs unlock Content\StarterContent\Props\MaterialSphere.uasset
Enabling locking in Unreal Editor
If you use lfs locking you need to install a plugin in the Unreal Editor.
The ProjectBorealis plugin can be found here. This plugin can be downloaded and added to a project.
To add the plugin as a submodule, so you can refresh it from it's own git project as it changes, use these commands:
Make the Plugins dir only if it does not exist
mkdir Plugins
Install the plugin
cd Plugins
git submodule add https://github.com/ProjectBorealis/UEGitPlugin
If you are using Visual Studio you will need to regenerate the Visual Studio project files (by right-clicking on the .uproject file) at this point. Once the project is restarted the plugin should be enabled automatically.
Once the project has been restarted right-click any asset or the Content directory and select "Connect to Reversion control ...". This opens the following dialog:
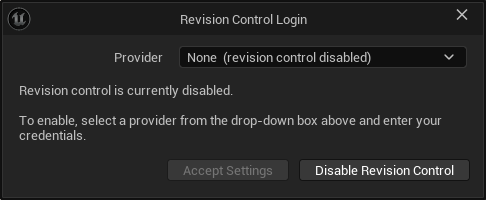
Select "Git LFS 2", enter your Azure git username, and click "Accept Settings"
Now you should be able to right-click an asset or a directory and chose "Reversion Control | Check Out" to lock the asset(s). Then the command "git lfs locks" can be used from the command line outside the editor to confirm the file(s) are locked.
If multiple people are working on the project then you should use the "Sync and Check Out" option. This ensures you have the latest version before you lock it. If you simply check out the file you risk the situation where another person has locked the file, edited it, then pushed it and unlocked it. The file is unlocked (so you can lock it) but you do not have the latest version, so if you lock it and change it you won't be able to push your changes.
The page also contains important notes in the section "Note about Unreal configuration" which require a few changes to project configuration files.
Non-Obvious Things
To push changes to an asset use Tools | Submit Content, or right-click and use Reversion Control | Check In.
If the "Check In" option is not enabled, check the symbol on the asset - if you have the asset checkout out you should see a tick like this:

If instead of the tick you see this symbol:

another user has the file locked. This symbol might also appear if your git username is different to what you specified in the Unreal Editor. The editor settings can be viewed and changed using the Tools | "Change Revision Control Settings ..." dialog.
Errors
This error from Azure:
LFS: Client error &{%!!(string=https) %!!(string=) %!!(*url.Userinfo=&{unrealcodenet  false}) %!!(string=dev.azure.com) %!!(string=/unrealcodenet/CourseraOne/_git/CourseraOne/info/lfs/objects/b88a3fe4fde82ce9d9583d4cd83e33edaf5963b2a33f134930854438b2623332) %!!(string=) %!!(bool=false) %!!(bool=false) %!!(string=) %!!(string=) %!!(string=)}s(MISSING) from
HTTP 413
can sometimes be fixed by using this command:
git config http.version HTTP/1.1
or
git config --global http.postBuffer 157286400
git config --global http.maxRequestBuffer 157286400
Reference
Feedback
Please leave any feedback about this article here