Optimization Part 1 - Build Configurations
This article explores project build configurations.
Unreal Engine projects can be built with different configurations which serve different purposes. The solution configurations available depend on the whether you are building with the Unreal Engine source code.
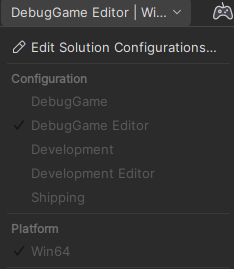
If you create a project by launching Unreal Editor from the Epic Launcher, then you are using the engine compiled by Epic and you will see these configuration options in Visual Studio:
If you are compiling the engine from source code, you will see these configuration options in Visual Studio:
In Rider with a non-source build the options are the same:

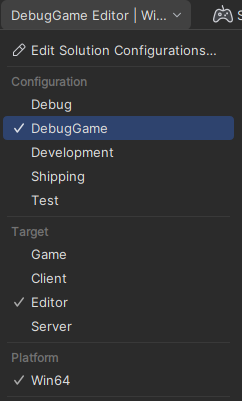
In Rider with an engine source build is it more obvious you are selecting one configuration and one target:

These configurations reflect:
- if you are compiling the engine source code or not. Engine source code builds offer more configurations but take a long time to compile the engine initially
- if you are working on a standalone game or a multiplayer game (which is split into client and server components)
- if you are building a debug version or a non-debug version (which is referred to as "development")
- when you compile the program and run it, it will launch one of:
- a standalone game
- the server part of a multiplayer game
- the client part of a multiplayer game
- the Unreal Editor
The following table lists the Debug configuration options. These are for when you are compiling the engine source yourself and want to debug your code and the engine code.
| Configuration | Needs Engine Source | Engine Code | Your Code | Runs | Purpose |
|---|---|---|---|---|---|
| Debug | Yes | Debug | Debug | Single player game | Debugging a single player game |
| Debug Client | Yes | Debug | Debug | Game client | Debugging the client part of a multiplayer game |
| Debug Server | Yes | Debug | Debug | Game server | Debugging the server part of a multiplayer game |
| Debug Editor | Yes | Debug | Debug | Editor | Debugging your game and the editor |
The following table lists the DebugGame configuration options. These are for when you want to debug your own code but use an optimized version of the engine code.
| Configuration | Needs Engine Source | Engine Code | Your Code | Runs | Purpose |
|---|---|---|---|---|---|
| DebugGame | No | Release Optimized | Debug | Single player game | Debugging your own code in a single player game, builds your game code with debug, non-optimized, but the engine code is not debug and is optimized |
| DebugGame Client | Yes | Release Optimized | Debug | Game client | Debugging your own code in the client part of a multiplayer game, builds your game code with debug, non-optimized, but the engine code is not debug and is optimized |
| DebugGame Server | Yes | Release Optimized | Debug | Game server | Debugging your own code in the server part of a multiplayer game, builds your game code with debug, non-optimized, but the engine code is not debug and is optimized |
| DebugGame Editor | No | Release Optimized | Debug | Editor | Builds engine, editor in release mode and your code in debug, and runs the Unreal Editor |
The following table lists the Development configuration options. This is for non-debugging activities.
| Configuration | Needs Engine Source | Engine Code | Your Code | Runs | Purpose |
|---|---|---|---|---|---|
| Development | No | Release Optimized | Release Optimized | Single player game | Running your game without debug information |
| Development Client | Yes | Release Optimized | Release Optimized | Game client | Running the client part of your multiplayer game without debug information |
| Development Server | Yes | Release Optimized | Release Optimized | Game server | Running the server part of your multiplayer game without debug information |
| Development Editor | No | Release Optimized | Release Optimized | Editor | Same as above but for loading in the editor, so when you run it the executable it will run the editor not the game |
The following table lists the Shipping configuration options:
| Configuration | Needs Engine Source | Engine Code | Your Code | Runs | Purpose |
|---|---|---|---|---|---|
| Shipping | No | Release Optimized | Release Optimized | Game | |
| Shipping Client | Yes | Release Optimized | Release Optimized | Game client | |
| Shipping Server | Yes | Release Optimized | Release Optimized | Game server |
The following table lists the Test configuration options:
| Configuration | Needs Engine Source | Engine Code | Your Code | Runs | Purpose |
|---|---|---|---|---|---|
| Test | Yes | Release Optimized | Release Optimized | Game | Shipping configuration, but with some console commands, stats, and profiling tools enabled |
| Test Client | Yes | Release Optimized | Release Optimized | Game client | Shipping configuration, but with some console commands, stats, and profiling tools enabled |
| Test Server | Yes | Release Optimized | Release Optimized | Game server | Shipping configuration, but with some console commands, stats, and profiling tools enabled |
The need for packaging
Some configurations (such as "Debug") run using files which are created by cooking or packaging the project. If you have never cooked or packaged the project you get this error message:
And in the log you will see something like this:
LogShaderLibrary: Display: Logical shader library 'Global' component count 0, new components: 0
LogShaderLibrary: Display: Running without a pakfile and did not find a monolithic library 'Global' - attempting disk search for its chunks
LogShaderLibrary: Display: .... not found
LogShaderLibrary: Error: Failed to initialize ShaderCodeLibrary required by the project because part of the Global shader library is missing from ../../../../../EpicSource/UnrealEngineSource521/../../work/LyraCombined/work/Content/.
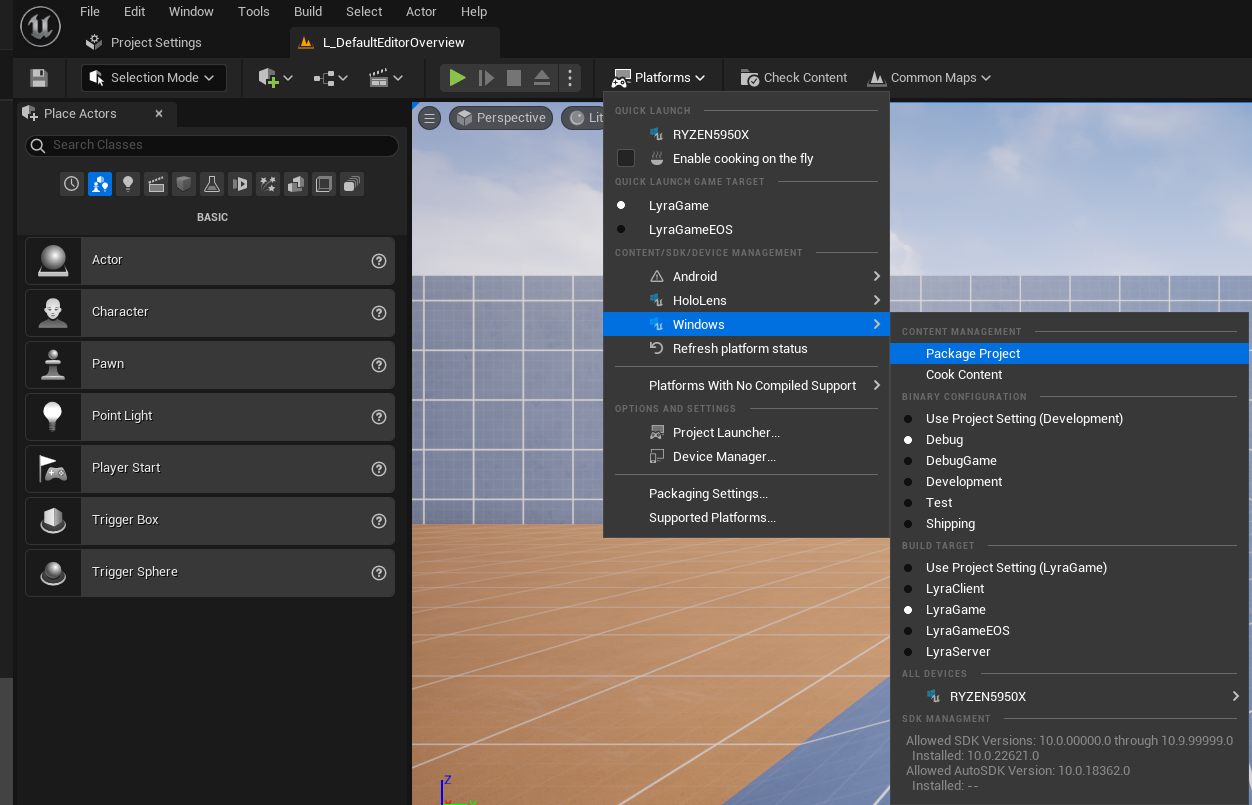
Use Platforms | Windows | Package Project to make the required files. This requires you to use another configuration such as Debug Editor in order to actually run the editor to do the packaging. The image below shows the cooking options for the "Debug" configuration of the Lyra sample game:

Different configurations use different cooked or packaged files. For example if cooking the Lyra example project you need to package with different settings for the Debug and Debug Client configurations, changing the "Build Target" property from "LyraGame" to "LyraClient".
The cooking process creates files (based on the above example) in Saved/Cooked/Windows/Lyra.
Target.cs files
Different configurations use different Target.cs files to change build settings.
These are named <GAME_NAME><BUILD_CONFIG>.Target.cs file, for example the Lyra project has these files:
- LyraClient.Target.cs for client builds
- LyraGame.Target.cs for standalone game builds
- LyraServer.Target.cs for server game builds
- LyraEditor.Target.cs for editor builds
All builds can have debug symbols
All configuration, including shipping builds, can have symbols files for debugging if:
- they are built with Visual Studio or
- Project Settings | Project | Packaging | Include Debug Files is turned on
This means you can debug shipping builds.
Attaching the debugger
A debug version can be made to wait until the debugger is attached using the -WaitForAttach parameter like this:
Binaries\Win64\LyraClient-Win64-Debug.exe -WaitForAttach
Run this command, and then in Visual Studio use the Debug | Attach to Process command.
Reference
Feedback
Please leave any feedback about this article here